Friday, July 22, 2011

Tea-Dyed Lace Winner

Alright, so I had meant to make a post yesterday reminding people about this giveaway, but I'll admit, I was a little swamped with job applications and dealing with other employment (or lack thereof) woes, and I completely forgot. Darn life, getting in the way of my sewing and blogging time!

I considered waiting another day to allow others to sign up for the Tea-Dyed Lace Giveaway, but that's not very fair to the people who signed up already, so I'll just have to be more proactive next time!

SO, the winner of this lovely length of tea-rific lace is...

Joyce in NC! Congratulations! Joyce, I can't seem to find an email address in your profile, so if you could send me an email (sewingonpins at gmail dot com) with an address that I can ship the lace to, I'd appreciate it.

Also, some good news to all of you tea-dyers. I washed my Navy Rose dress (in cold water, normal cycle, regular detergent - even threw it in the dryer), and the lace came out with little to no fading. Was a little wrinkly, though. I'm vastly relieved, because I feared it would come out a dingy white. PHEW!

Original white on bottom left, after tea-dying and ironing on bottom right, after a wash cycle at top.

Happy sewing, everyone!

Monday, July 18, 2011

Tutorial: Tea-Dying Lace (+ Giveaway)

I mentioned in yesterdays Navy Rose Dress post that I'd tea-dyed the lace at the bottom of the skirt. It was so much fun, I keep looking around for more things to dye! I thought I'd share the (extremely simple) process here, not because there's no other tutorials out there (there are tonnes), but because I really hope it inspires some of you to try your hand at it!

As you can see above, it will turn white cotton to a slightly rusty light brown colour. Of course, material type, tea strength, and length of steeping will effect what colour your material will dye to, and some experimentation may be needed to get the colour you want. Keep in mind that tea-dyed material could fade with time, exposure to sunlight, or repeated washings. In fact, some detergents could take out the dye entirely, so be aware of that. In addition, bleach should remove the tea-staining completely, which is useful if you're not happy with the resulting colour!

Stuff You Need:

Material to dye. Some lace, fabric, thread, string, etc. Keep in mind that only natural fibres can be tea dyed (cotton, silk, maybe wool, etc.), as synthetic material will not hold the dye.

Tea. So far as I know, any kind will work. I used just regular old orange pekoe that we've had kicking around for a while, but any black tea should work. I hear that coffee also works well, but is more aromatic than tea. I'm excited to try out coffee and different tea types, just to see what happens. YAY EXPERIMENTS!

Water. I boiled mine in a pot on the stove. I believe that the water should be hot to get the most colour out of the tea bags. As an added bonus, it helps pre-shrink your lace (or whatever you're dying)!

Container to dye material in. You'll need a container large enough so that the material you're dying can move freely in it. I used a small pot since I was only dying a small amount of material, but sadly it's formally white interior is now tea-dyed. LUCKILY, a bit of bleach should take out the stain. (I hope, because it's my Grandma's pot.)

Instructions:

Bring your water to a boil and add the tea. Allow it to steep for about 5 minutes (or maybe longer if you're using a lot of water). I used 2-3 cups of water, and 3 bags of tea. For the lace shown at the top of this post, I used about 4 cups of water and 6 tea bags. It didn't turn out much darker than the lace I dyed for this post, so I don't think as many tea bags were needed. Once again, trial and error will be your friend here.

Add your material to the dye. Stir it around occasionally to, and make sure that the material all remains submerged.

Allow to sit for a while. I left this batch in for about 10 minutes, but I have read about some leaving it for an hour, a couple hours, and even over-night. I didn't want this lace to get too dark, so I only left it for about 10 minutes. The colour of the material will be much darker when wet than it will be when dry. Keep this in mind during steeping.

The initial tea-staining occurs very rapidly, but I'm curious about the longevity of the dye with different lengths of steeping time. I fully plan to experiment in the coming weeks, and will let you know what I find out.

Pull out your material and rinse out the excess tea. You may notice that it already lightens up a bit. I've seen people recommend machine washing the material at this stage. Depending on your material type and what you intend to use it for, that may be the best option. I chose to simply hand-wash the material with a small amount of detergent. This step will also lighten up the dye a bit.

Dry your material. I chose to dry it using an hot iron, which allowed me to press it flat at the same time. You can see how much lighter in colour the dried lace is than when it is wet.

Et voilĂ ! A lovely tea-dyed bit of lace (or whatever you chose to dye) to add a bit of vintage charm to your project. It may be difficult to see in these pictures, but the original lace here had two colours in it, with the centre scoop shape in white and the rest of it in cream. I loath white and cream together (hence choosing it to dye). If you look closely at the dyed lace, the centre scoops are a lighter shade than the rest of the lace. I much prefer the two tone effect in the dyed lace!

Another thing to keep in mind is that tea-dying will not generally produce a uniform dye. There may be dark spots and light spots in it. I adore the effect on the lace, but it may not be as charming on a larger piece of material.

Now for the giveaway!

Would anyone be interested in this tea-dyed bit of lace? It's a cotton crocheted lace, approximately 1.85 m long. If so, comment below before Friday morning (July 22), and I'll choose a winner using an online random number generator at about noon, central standard time (Manitoba, Canada - if that helps for my international readers).

And yes, this is open to everyone living on Earth. Sorry to any readers on the Moon or Mars, the shipping rates to you is just way too expensive! D:

Sunday, July 17, 2011

Finished Object: Navy Rose Dress

I'm back in Manitoba, and nearly all my sewing stuff is in one place! YES!! \o/

So of course I started sewing immediately. Actually, I bought the dress below on sale for $20. I adored it, but it was just too short on me. I considered trying to do something to lengthen it, but looking closer at the dress, I figured I could probably make it myself. I got a few quick measurements of the bodice and looked at how they did the back detail (elastic along the upper back to keep it in place. Neat!), returned the dress, and tried my hand at it.

Isn't the lace beautiful? Oh, I wish I could've made it work just for the lace!

Look at how it turned out! I'm pretty proud of myself, recreating a dress (sort of) I liked with only a few measurements and my own sketches. I've never done this (successfully) before! I used the floral cotton voile I rewarded myself with after my thesis defense, and blogged about here.

Oh, there's a few problems with it. The shirring turned out to be way too tight. It's wearable, but only just. I suspect that I wound the elastic thread on the bobbin too tight. Oops. The bodice has no structuring besides gathering along the bottom where it joins with the shirred skirt. There was a bit of gaping along the armhole, but taking in the sides 1 inch helped immensely.

I'm not a big fan of how the bottom ruffles turned out. I may yet tear it out and try something else, since it's borderline Little House on the Prairie.


I suspect that the lace I used on the bottom ruffles are too heavy or something. But I'm pleased with the colour of the lace, since I tea dyed it from blinding white to this beige-y brown. It picks up the subtle colour in the small background flowers nicely.

But overall, I really like how the dress turned out. I couldn't find a lace anywhere near as lovely as the one on the original dress (not a surprise with the limited selection at Fabricland), but I'm pleased with the one I used. I even cut out around the flowers to make it a little bit more interesting.

One of my favourite parts of this dress is the back. It's lower cut than the front, and the elastic along the top makes the fit snug without being too tight (or needing a zipper). The spaghetti straps look cute, and were made by making my own 1/4 inch non-bias tape (made the same way as bias tape, but cut on grain to prevent stretching).

Anyways, thanks again to you all for being patient and not abandoning me! I'm in the middle of job hunting right now, but I will be posting more often, and this time I mean it!

Tuesday, July 12, 2011

A Quick Apology, Update, and a Sad Send Off

Hi everyone! I'm sorry I've been mia of late, I've been visiting friends and family here in Ontario before heading back to Manitoba, and while I've been babbling sewing with my quilting Memere (who also used to sew all her own clothes), shopping for fabric in Toronto, and even hand-sewing a small bag for my brush and deoderant, I haven't had much time online.

I don't even have much time tonight, and I'm on my Grandparents computer, so no photos.

I do have some sad news to report. I managed to tear a hole in my very first me-made shirt. It's funny, because right before I did it, I was just thinking, 'I wonder how much longer I'm going to be able to wear this top, and when will I finally be willing to toss it out'. *rrrriiiiiippppppp* D:

Anyways, I'm headed back home tomorrow, so look out for more updates!

Friday, June 17, 2011

Burda Style 6/2011

A few days ago, I mentioned the Burda Style magazine I picked up recently (6/2011), and people seemed interested in a recap of what's inside. Well, I'm sick of doing thesis edits, so here's that recap! WARNING: Picture Heavy!

Being the June edition, there's a strong bias towards beach wear and fun summery clothes. I adore almost all of it. While there's not a lot of structured garments, who wants to wear constricting clothes in the summer! There's some fabulous basic pieces in this.

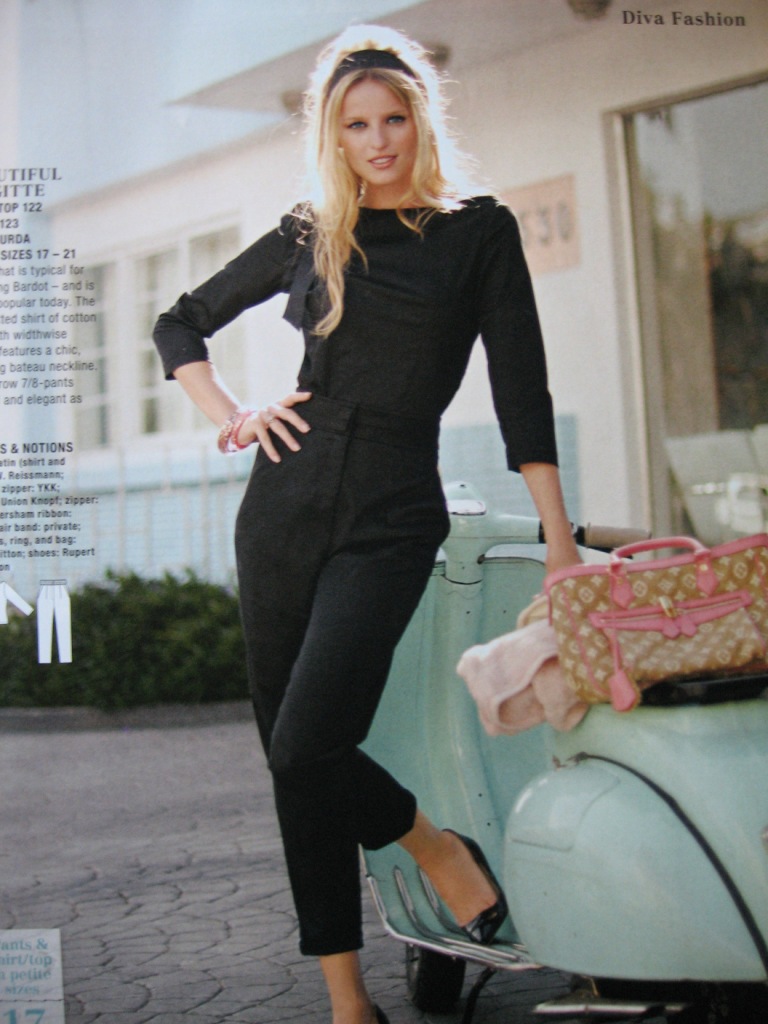
First off, they did a bit of a tribute to Brigitte Bardot, and from what I read in this article, they hit the nail on the head capturing her style, with lots of feminine and chic - but simple - pieces, and great styling.

LOVE this top! (And the one above it, too!) It'd be difficult to get the wide neckline right so that it's not slipping off the shoulder or showing off bra straps (although I just discovered that strapless bras can actually be comfortable if you get the right kind, so I may need to take advantage of that). This would look fantastic with my denim pencil skirt, I think!

Okay, so I won't be wearing a bikini any time soon, but I've been wanting to make some simple undergarments for relaxing at home, so I'm not stuck in my more structured pieces. I really want to make this bikini top, and I want to try out the bottoms as underwear, as I don't have a pattern that works for wovens.

J'adore this dress, although I'm not sure if it'd be a good look on me with my larger bust and hips. The sweatheart neckline, fitted bodice, and flaired skirt in such a feminine floral fabric is just lovely!

They recommended painting little hearts on a pair of ballet flats (which I think is a cute idea, actually), and I loved the look so much, I was inspired buy these ballet flats (below) yesterday!

I wasn't a fan of the next set of garments, although they were certainly colourful! I liked this one below as a cover-up in the summer, though!

I wonder if a pattern for the parrot is included?

Okay, so the dress above is cute, but I can't get away with wearing something like this. With a larger bust and hips, I'd probably look like I was wearing a potato sack (granted, a colourful and fun potato sack). Probably wouldn't be hard to fix, though, with a self-fabric belt or something.

What I liked about this Burda edition is that they're targeting beginner sewists. They wrote up this step-by-step tutorial to make the pink dress above (it even has pockets!), and I think it's a much better first project than the shorts or A-line skirt most people start with! Really easy with great results. May need to keep this in mind for the next time I convince a friend to start sewing!

Don't these two dresses scream summer? I noticed that Burda remakes the same garments in different fabrics and styles throughout the magazine, but I liked that as you can see the diversity of the pattern. I often get stuck on how the envelope design and get intimidated from trying different fabrics, so I appreciated the multiple versions of the same pattern.

I'm loving all the plaid fabric they used! Seriously, Fabricland needs to get some larger print plaids in stock.
Okay, this is the same blouse shown in the Brigitte Bardot section, but how cute is it made up in a sheer fabric! I wish I'd seen this before I cut into my sheer black polka dot fabric shown here.

Love this wrap top...thing. They had made it up as a beach cover up earlier on in the magazine, but it only caught my eye here in the white. See, that's another reason to appreciate them making it up in different fabrics! Diversity, I love it.

Once again, another good beach cover up when full length. I like the simplicity of it, rather than the drape-y complexity of the bright one shown earlier in the post. I also think this would make a fantastic top if shortened, or a great dress if you omit the slits! Yay longer sleeves!

This is a very basic and loose top, but I really like it. It would be easy to adjust, too. Add a self-fabric belt or a bit of shirring on the sides or back to define the waist a bit, and it'd be perfect!

The dress here is just a longer version of the top above, and I adore the simple lines. Once again, very easy to alter, if needed. I love the idea of making it in an eyelet, although I'm always torn with the fabric. Do you line it? Leave it unlined?

I'm always on the look out for cute blouses. I'm not sure if this one would ever work for me and my curvy body, but I love the simplicity of it, and the gathers at the shoulder front. Here though, it's styled to be another beach cover up.

I wasn't a big fan of most of the trousers in this edition, to be honest. Cute fabric, though. For those of you with little boy sprogs, the shorts the kid is wearing is also in the magazine.

Actually, there were some cute kids outfits in this magazine. My favourite is this adorable purple dress. And also maybe the man carrying her. Where can I get one of those?!

In previous Burda magazines that I've managed to take a look-see through, I've generally been impressed with the plus sized garments. In fact, I'm planning on making this dress from Burda Style 9/2010. So I was excited to see what summery garments they'd come up with in this edition.

Boy was I disappointed. Granted, the coat above is sort of cute, but everything in this section was baggy drapey shapeless knits in black. Wow summery.

I mean, can it get much uglier and less flattering than that dress on the right? And what the heck is going on around the crotch of those pants? Maybe they'd be nice if made up, but I doubt I'd ever give them a shot.

The preview for next month is pretty uninspiring, I'll be honest. I probably won't even try to track it down. There's enough pieces that I love in this edition that I don't really need to, anyways.

However, this plus-sized dress is promising...may be worth checking out on the Burda Style site.

So there's a quick recap of some of my favourite (and less than favourite) garments from the June edition of Burda Style! I don't know about you guys, but I'm excited to try out a few of them! The only downfall of the magazine is this:

EEP!
Related Posts Plugin for WordPress, Blogger...