Showing posts with label Tutorial. Show all posts

Tuesday, June 24, 2014

Burlap Wedding Favour Bags

NO NOT MY WEDDING.  My favourite cousin is getting married this summer, and I happily volunteered myself to make up her wedding favours!

She's planning on having a country wedding at my Grandma's country farm house.  She showed me all of her plans when I was visiting in April, which involve a lot of burlap and candles and lace and haybails and all sorts of gorgeous ideas.  And she's trying to do it all on a dime.

Her wedding favours will be a candy table, and people can fill up little fabric bags with which ever candies they'd like.  It's a cute idea that I've seen before, and a ton of fun.  Especially since everyone will be higher than a kite on sugar!

But their plan was to just get whatever fabric they could find and toss together these little bags.  I looked at the mismatched bits of satin and cotton and polyester they'd gathered together, and I admit, made a bit of a face.  It just wasn't going to match with the rest of the theme. 

Since I really wanted to help out despite being so far away, I (of course) volunteered to take over this project.  My cousin seemed more than happy to hand it off, especially after the ideas I tossed out.

Here's my first attempt at it!  They're about 6.5"x5" in size.  I'm going to walk you through how I made them.  Just because.  :) 

I was able to source some free burlap in the form of coffee bean jute bags from a local coffee roaster.  Which are soooo cool because they have all of this great graphics printed on them!  I washed them a couple of times, dried them a couple of times (the second time to try to get rid of more of the fluff they generated after washing), and then spent most of today ironing out the plethora of wrinkles that set in.


It took a healthy dose of heat, steam, and a lot of arm muscle to press those damn wrinkles out!  And holy crap is there a lot of fluff all over my sewing room now.  


I LOVE the graphics!  Seriously, I'm saving one of these bags to make up into a burlap messanger bag for myself.

Because these bags will be used to hold candy, I lined them with some tight-weaved but light-weight cotton.  I'm actually considering using plastic instead for the next batch, which I didn't think about until just now.  Actually, I might just include some plastic sandwich bags to go inside of them.  Might be easier, on me and my sewing machine.

Once I basted the fabric to the jute bag, I cut it into 15 inch wide strips.  These strips were pressed in half length-wise, and the raw edges folded over and sewn down to create a draw string loop on the top of the bags.

Then I zig-zagged some lace just underneath the draw-string loop.  Finally found a use for my vast collection of vintage and modern lace!

Here's the other side.  You can see the lining and the folded over tops for the draw-string.

Then I just folded the strip in half again, cut them into 5 inch wide bags, and zigzagged along both edges just below the draw-string loops.

Thread some lace and jute through the draw-string loops...

And voila!  Seven adorable favour bags finished...


...only another 200 to go.  Sweet peanuts...

Plans and experiments for some non-burlap bags...

Friday, February 28, 2014

Homemade Garter Tutorial


For reasons mentioned here, I had the fun opportunity to sew up a garter!  And it was so much easier than I expected.  Still, some people were surprised when I said I'd made it myself, so I thought I'd throw together a very quick and dirty tutorial on how to sew one.

Please forgive the powerpoint pictures.  IF IT'S GOOD ENOUGH FOR MY M.Sc. THESIS*, IT'S GOOD ENOUGH FOR THIS BLOG.  I ain't no fancy photoshopper or photo editor!

Anywho, here's what you need:
  • 1/4 inch elastic - length needed to snugly fit around your thigh (where you want the garter) stretched out tight. 
  • ~3/4 m wide lace - mine was ~2.5 inches wide.
  • ~3/4 m ribbon - mine was 5/8 inch wide.
  • Matching thread.
Legend for my upcoming awesome Powerpoint figures

STEP 1: Attaching Elastic to the Lace


Look at that sweet elastic and lace drawing!  Stretch that elastic as much as possible as you sew.  Don't worry if you have excess lace.
Sew elastic to the middle of the lace using a zigzag stitch, stretching out the elastic as far as possible as you sew.  I just eyeballed this - it's not really noticeable if you go off-centre once it's all scrunched up.

I found it easiest to control the lace and elastic if I held both ends as it passes through the machine.  Make sure to backstitch at the beginning and end to solidify the stitch!


STEP 2: Sewing on the Ribbon

This part is a little tricky.  Tack the ribbon to the lace at one end with the elastic sandwiched between the two.  I recommend having the lace on top and the ribbon on the bottom.  You could have the ribbon on top, but I found it easier to see if the elastic was covered when looking through the lace.

Most normal people would probably pin this.  I eyeballed it.  What can I say, I'm lazy.

With the elastic and lace part stretched as far as possible, sew along one side of the ribbon through the lace using a straight stitch, catching just outside the elastic if possible.  (Don't worry if you sew through the elastic, just make sure it's stretched out.)  Sew to the end of the elastic, and backstitch.

Repeat on the other side of the ribbon.  The set up for these two rows are fiddly, but it gets easier once you start sewing.

The above photo is the underside of the garter.  See how the elastic is zigzag stitched to the lace, and the ribbon is straight stitched to the lace, sandwiching the elastic.


STEP 3: Snip and Seam

This part is easy.  Snip off the excess lace and ribbon, where the elastic ends...

...then line up the ends, wrong sides together, and stitch a straight-stitch seam up the side.  I backstitched over the elastic portion a few times to give the seam more strength.

Snip your threads, trim your seam (if needed), and you're done!  Easy peasy.  Wear your gorgeous hot little garter with pride and proudly flaunt that you made it yourself.  Brace yourself with demands to make everyone else one.


* I'm serious, I created most of my M.Sc. thesis figures and diagrams in Powerpoint.  It's a point of pride for me.

Monday, July 18, 2011

Tutorial: Tea-Dying Lace (+ Giveaway)

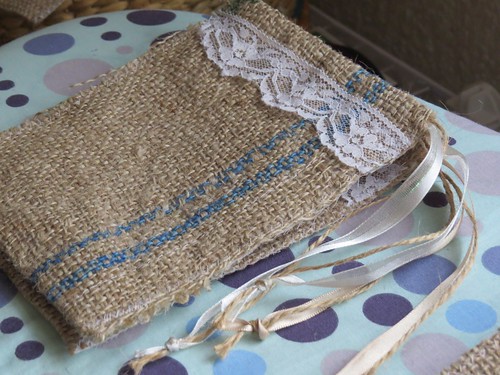
I mentioned in yesterdays Navy Rose Dress post that I'd tea-dyed the lace at the bottom of the skirt. It was so much fun, I keep looking around for more things to dye! I thought I'd share the (extremely simple) process here, not because there's no other tutorials out there (there are tonnes), but because I really hope it inspires some of you to try your hand at it!

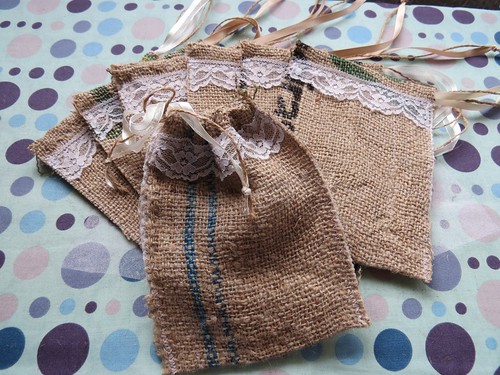
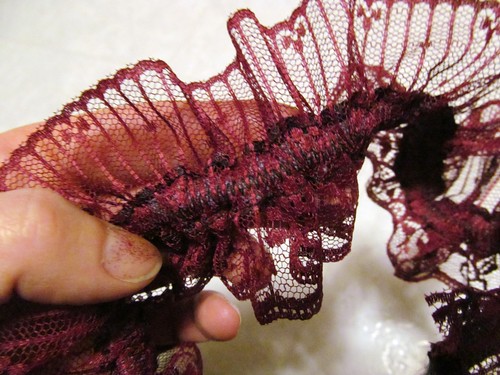
As you can see above, it will turn white cotton to a slightly rusty light brown colour. Of course, material type, tea strength, and length of steeping will effect what colour your material will dye to, and some experimentation may be needed to get the colour you want. Keep in mind that tea-dyed material could fade with time, exposure to sunlight, or repeated washings. In fact, some detergents could take out the dye entirely, so be aware of that. In addition, bleach should remove the tea-staining completely, which is useful if you're not happy with the resulting colour!

Stuff You Need:

Material to dye. Some lace, fabric, thread, string, etc. Keep in mind that only natural fibres can be tea dyed (cotton, silk, maybe wool, etc.), as synthetic material will not hold the dye.

Tea. So far as I know, any kind will work. I used just regular old orange pekoe that we've had kicking around for a while, but any black tea should work. I hear that coffee also works well, but is more aromatic than tea. I'm excited to try out coffee and different tea types, just to see what happens. YAY EXPERIMENTS!

Water. I boiled mine in a pot on the stove. I believe that the water should be hot to get the most colour out of the tea bags. As an added bonus, it helps pre-shrink your lace (or whatever you're dying)!

Container to dye material in. You'll need a container large enough so that the material you're dying can move freely in it. I used a small pot since I was only dying a small amount of material, but sadly it's formally white interior is now tea-dyed. LUCKILY, a bit of bleach should take out the stain. (I hope, because it's my Grandma's pot.)
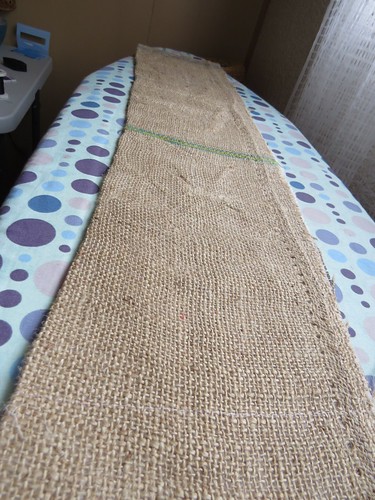
Instructions:

Bring your water to a boil and add the tea. Allow it to steep for about 5 minutes (or maybe longer if you're using a lot of water). I used 2-3 cups of water, and 3 bags of tea. For the lace shown at the top of this post, I used about 4 cups of water and 6 tea bags. It didn't turn out much darker than the lace I dyed for this post, so I don't think as many tea bags were needed. Once again, trial and error will be your friend here.

Add your material to the dye. Stir it around occasionally to, and make sure that the material all remains submerged.

Allow to sit for a while. I left this batch in for about 10 minutes, but I have read about some leaving it for an hour, a couple hours, and even over-night. I didn't want this lace to get too dark, so I only left it for about 10 minutes. The colour of the material will be much darker when wet than it will be when dry. Keep this in mind during steeping.

The initial tea-staining occurs very rapidly, but I'm curious about the longevity of the dye with different lengths of steeping time. I fully plan to experiment in the coming weeks, and will let you know what I find out.

Pull out your material and rinse out the excess tea. You may notice that it already lightens up a bit. I've seen people recommend machine washing the material at this stage. Depending on your material type and what you intend to use it for, that may be the best option. I chose to simply hand-wash the material with a small amount of detergent. This step will also lighten up the dye a bit.

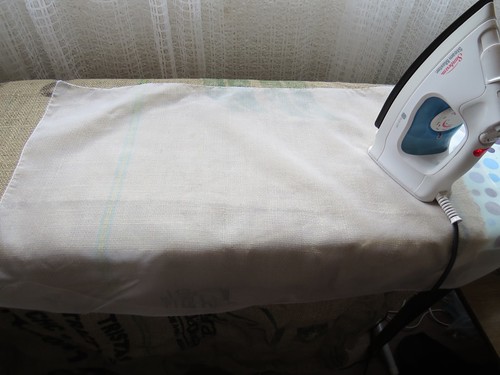
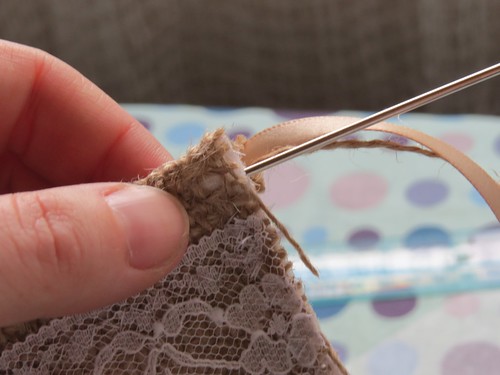
Dry your material. I chose to dry it using an hot iron, which allowed me to press it flat at the same time. You can see how much lighter in colour the dried lace is than when it is wet.

Et voilĂ ! A lovely tea-dyed bit of lace (or whatever you chose to dye) to add a bit of vintage charm to your project. It may be difficult to see in these pictures, but the original lace here had two colours in it, with the centre scoop shape in white and the rest of it in cream. I loath white and cream together (hence choosing it to dye). If you look closely at the dyed lace, the centre scoops are a lighter shade than the rest of the lace. I much prefer the two tone effect in the dyed lace!

Another thing to keep in mind is that tea-dying will not generally produce a uniform dye. There may be dark spots and light spots in it. I adore the effect on the lace, but it may not be as charming on a larger piece of material.

Now for the giveaway!

Would anyone be interested in this tea-dyed bit of lace? It's a cotton crocheted lace, approximately 1.85 m long. If so, comment below before Friday morning (July 22), and I'll choose a winner using an online random number generator at about noon, central standard time (Manitoba, Canada - if that helps for my international readers).

And yes, this is open to everyone living on Earth. Sorry to any readers on the Moon or Mars, the shipping rates to you is just way too expensive! D:

Monday, April 11, 2011

Tutorial: Stabilizing Thin Fabric for Buttonholes

I have a tip for you about buttonholes. Or rather, stabilizing thin fabric so that it doesn't get sucked into the depths of your sewing machine while making the buttonhole!

On the garment I'm working on, I chose not to use the recommended interfacing, as I want this to be a very airy, casual summer piece. (No stiffness allowed!) However, it has something like 11 billion buttons with accompanying buttonholes, and I'm using a very lightweight cotton swissdot. On all my practice runs, the fabric got eaten by the machine.

I've heard of some people using tissue paper to stabilize fabrics during sewing, but I didn't have any on-hand (that I was willing to destroy). I did, however, have some fusible hem web. This stuff is very thin but strong and smooth enough to resist being pulled into the machine.


Stabilizing Thin Fabric for Buttonholes

1) Mark the location of the buttonhole with a ballpoint pen fabric marker, something darker that you can see through the hem webbing.

2) Baste stitched two strips of the hem webbing on either side of the fabric. Make sure there is enough room for the buttonhole!


3) Stitch your buttonholes.

Please, no comment on how crooked mine are. This is a tutorial on stabilizing thin fabric, not on making perfectly straight buttonholes. I'm not using my own machine, and the Kenmore buttonholer is driving me bonkers!


4) Pull out the basted stitching and simply tear off the fusible hem web! The stuff I used was very thin, so it tore off very easily.


5) Cut your buttonhole, and c'est finis! A (hopefully) lovely buttonhole without it become dinner to the feed dogs. Or if the buttonholes are wonky like mine because you are incapable of lining them up correctly, find some shiny buttons to distract!

Who knew cutting buttonholes could be so pretty! Perfect focus is perfect, yo.


Now, I know there is a chance that not all of the fusible web has come off, but when I went to iron the buttonholes after this picture was taken, I just put a press cloth on top of it. Any residual stickiness seemed to go away. I imagine this would work just as well with some left over pattern tissue paper, anything thin that would tear away easily.

I hope this was helpful! If not, well, at least it's here for prosperity, right? :)

Monday, April 4, 2011

Tutorial: Lining Up the Seamlines of a Dart

I'd like to share a tip on how to line up and pin the seam lines of darts, particularly on long vertical darts often seen on blouses and dresses. Every time I've had to sew them, I have a heck of a time matching up the seam lines properly, and I finally worked out a trick.


1) Mark Your Darts

On the back of your fabric, mark the locations of the small circles along the dart, as indicated on the pattern piece. Try to keep these dots small. I usually stick a pin through the centre, then draw with a ballpoint pen fabric marker or chalk directly below where the pin enters the fabric. Then "connect the dots", marking where the dart seam line will be (preferably with a different colour, but just make sure you don't obscure the dots).


2) Pin the Dots on the Donkey Darts

Take a pin and push it through the two dots directly across from each other on either side of the dart. Best to use long pins if possible, depending on how wide the dart is. Do this for all dots.

In addition, put a pin through the dot at the top of the dart where the seam lines connect, only catching where you marked the dot. This will help you when you fold the dart.


3) Pinchy Pinchy!

At each pin, pinch the fabric so that the two dots on either side of the fabric are touching, pierced on the pin, as shown below. Make sure that you haven't twisted the fabric and that the pin is going straight through the fabric.

Then simply bring the pointy end of the pin through the fabric below the dot, with the head of the pin over the edge of the dart. Do this for all pinned dots.

Complete the fold along the dart, then lightly press the fold flat. Add more pins along the dart, if needed.


4) Double Double Toil and Trouble

Double check to ensure that the seam lines are lined up properly, otherwise it could cause toil and trouble (and seam rippers). Sometimes the fabric shifts when you bring the pin back through the fabric, so it's always good to check. To do this, push a pin through the seam line on one side of the fabric, and make sure it's coming out through the seam line on the other side.

If the seam lines do not line up perfectly, then adjust the fabric until it does. I usually find that if it does shift, it's only by a tiny amount.


5) Sew Sew Sew Your Dart (Gently Down the Seam-Line)

Now all that you need to do is sew the dart! Et voilĂ , a perfectly lined up seam line for a perfectly sewn dart! Well, if you manage to sew it straight, which is usually where I go wrong. Sorry, I haven't any tips to help you out with that!

Related Posts Plugin for WordPress, Blogger...