Friday, July 23, 2010

Tangential Tiki Dress


This invite arrived in my inbox a few weeks ago:
"So it has been incredably hot and humid lately, so I think we need to have a Tiki Party! We will be serving all Tiki themed drinks, and you're, of course, expected to dress appropriately."

It's a party yay! Actually, it was this past Wednesday, and was smashing good fun with smashing good people and definitely smashing good drinks. Mmm...Pina Colada. Which of course lead to a smashing good headache the next morning, but that's the price we pay, I guess.

When I read the "dress appropriately" part, I of course, as a budding seamstress, decided to make my own outfit. Especially since I had some perfect fabric lying around, ready to be made into something awesome.


(The picture is being silly and won't upload horizontally. Not sure why blogger is doing this.)

I have no idea what the fabric is. It's a little stiff and looks like cotton, but it doesn't wrinkle at all unless you iron it with lots of steam and heat. It's comfy and cool though, so it's perfect for a summer dress.

Unfortunately, I thought of this only a couple days before the party, but leaving things to the last minute is a specialty of mine and I was not daunted. I knew that I wanted an easy-to-wear dress that looks casual, so I opted to alter a pattern I had for a tank top, Simplicity 4127.


I've made this top before (version B), and found that the v-neck was too low cut and the skirt gathers made me look pregnant. To solve this, I just traced the bodice pattern piece and readjusted the neckline v so that it was at a shallower angle, raising it up about 1.5 inches.

I completely redrafted the skirt portion and made a muslin out of some old broadcloth I had kicking around, and adjusted it from there. I wanted the dress to still be loose enough through the hips and stomach so I still included extra fabric in the skirt. But instead of gathering the skirt and sewing it to the bodice, I opted to made 2 pleats on the front and 2 on the back.


I also made the shoulder straps thicker to hide bra straps underneath, and made them in some left over fabric from the trousers I was working on ages ago.

I think the funniest part of this whole process was that I finished hemming the skirt of the dress literally 5 minutes before I had to leave to catch my bus. Whoops! I would've preferred to do an invisible hem, but that's what you get when you leave things to the last minute!
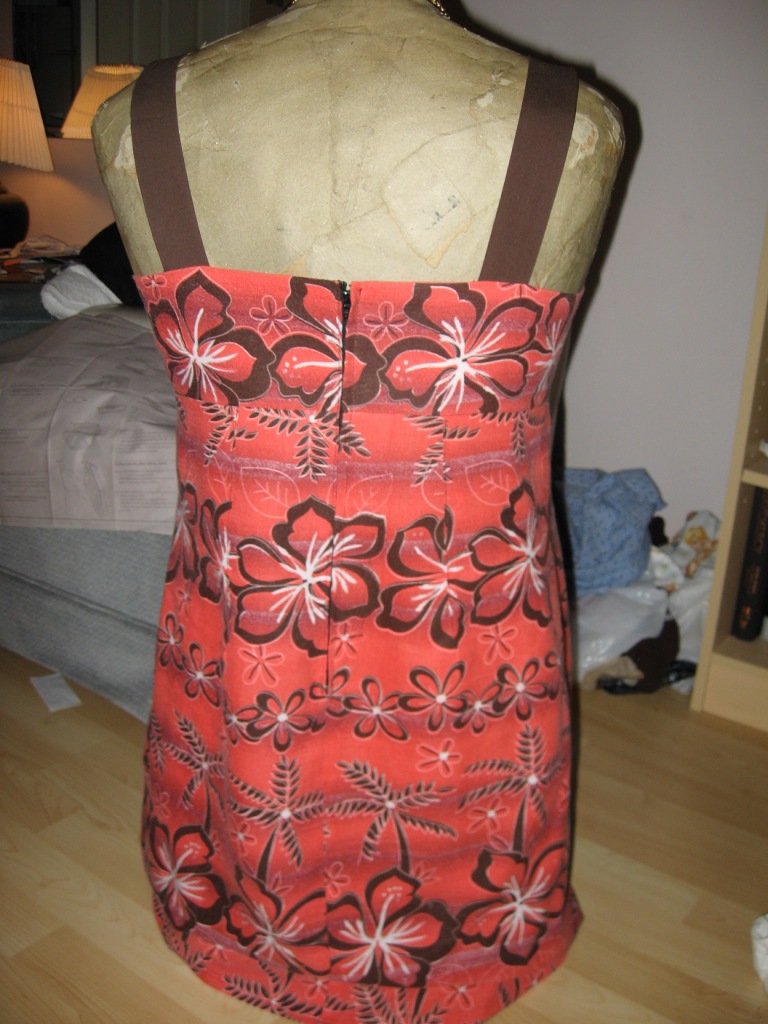

I did run into a few problems with this dress, mostly because I was rushing it and not thinking steps through properly. Silly me didn't do a full-bust adjustment, so while the neckline is a much more modest version, it sort of pancakes my poor girls a bit. The pleats on the back also looked kind of weird and made the back really unflattering to my hips and butt. So I sewed down the pleats on the back so that they acted like darts. The bodice, while snug, is livable.


It's not perfect. The back is still kind of wonky on me, and I should probably put in proper darts. But I wont. It's a comfortable dress that I enjoy wearing, flaws and all, and I'm really going to love having it part of my wardrobe this stickily hot and disgusting summer.

Saturday, July 17, 2010

A sheety blouse or a blousy sheet?


I've unfortunately been busy with my thesis the last while, but I have managed to sew up a blouse this past week from NewLook 6407. It was supposed to be a muslin, but I love the fabric I used (an old top sheet I bought at the thrift store for a couple bucks), so I decided to do a wearable muslin.


I actually did very little alterations to the pattern, only shortened the waist by 1/2 inch. I read many reviews over at PR that said that this pattern was quite snug, so I figured I'd just give'er on the muslin and fix any problems in the next try. It's quite comfortable, even in the bust, and I don't think I'll change anything next time.


I found it mostly went together really well, although this was the first time I've ever done vertical darts, and there were 4 of them in this pattern.


The only time I really ran into trouble was with the collar. This was also a new technique for me, and I found the instructions really hard to follow on this one. I attached the collar once, and found I'd completely messed it up.


But I found a video online that helped a bit, and after ripping off the first attempt, re-cutting the collar, and thinking about it a bit, I figured it out.


It's not perfect, but I'm the only one who knows about the problem areas, and for once, I'm not tattling on myself. ;)

I decided to finish the inside seams a bit more than I normally take the time to do. They're also not perfect, and definitely not professional, but it's finished. I just folded in both sides of the seams, then top-stitched.


The only part I didn't finish was the armholes, and I'm not sure if I'm going to go back and fix it. I guess I could add a Hong Kong seam (which would've been an option for all of the other seams). Meh, we'll see.


I think my 3 favourite things about this shirt is the collar, the self-covered buttons, and the curved hemline. Overall, I'm super proud of how this turned out. It was relatively easy but challenging enough that I learned a few new techniques and worked my way through a few issues. My finishing was much better than other projects in the past, and I've gotten a well-fitted, flattering top out of the deal!


I'll be adding this top to my contest wardrobe, since it actually goes well with other pieces I've made. I think I'm even going to make one more, out of a pretty quilters cotton I found at Fabricland yesterday.


A little wild, I know, but I really love the fabric. Heh, I think I'm only going to have my Wardrobe Contest storyboard finalized once I actually finish sewing it all! :D

Cheers all!

Friday, July 9, 2010

Self-Drafted Pattern Failure


Bugger. It's a good thing I made a muslin. This top, while cute in theory, is just not suited for a girl with large boobs. Why does everyone want these things?! They just get in the way and prevent you from wearing adorable clothes! *pouts*

It's just as well. Turns out I don't have enough of the planned fabric to do this top anyways.

Back to the drawing board. Literally and figuratively.

On the plus side, I found this adorable top over at Mod Cloth! Wouldn't it look pretty in a light coral cotton?

ROM Textile Display


I was in Toronto last weekend, visiting a friend, and she and her husband took me to the Royal Ontario Museum (ROM). It was filled with the usual amazing stuff, some not so unusual stuff (baby dino skeletons in an egg!), and we absolutely geeked out over the rocks and minerals display. About 20 minutes before the place closed, we went up to see the textiles display. Sadly, the exhibit is in the middle of being reworked, so there was very little descriptions on anything. Didn't stop me from geeking out, though!


A beautiful outfit worn by the mother of the last Emperor of China. She apparently had all the fabrics handmade to her specifications. I loved the details along the side slits and the threads wrapped in gold and silver to make them shine.

There were some rather...hideous things on display...


And then there was this gem that I thought was hideous at first, until I got a closer look at it.


(Sorry about the pictures being out of focus)

I like the way they used the fabric, I love the structure of the bodice and especially the way the sleeves are made. The invisible zippers along the side seams and cuffs are a pretty neat touch, too.

This one, while made with absolutely hideous fabric, has an interesting bodice. I like the shoulder wings!


There were several period pieces, but I ran out of time before I could spend much time with them.


And of course, LOOK AT THE CUTE SHOES!

Wednesday, July 7, 2010

Pattern Drafting and Muslin Making

The skirt mentioned in the previous post is now lined, the zipper properly attached, and the waistline band sewn on. All I need to do is add the button and button hole at the waist and hem both the skirt and the liner.

And I've completely lost steam on this project. Plus I need help doing the hem, so I can't even finish it right now anyways.

So I've started sewing one of the tops from my new plan for the wardrobe contest.


You can see the white skirt on there, mocking me with it's cuteness. I truly hate doing the finishing touches on my sewing projects. The top I'm working on is a self-drafted pattern inspired by the shirt shown below from over at ModCloths.


I love the back of this top.

One of the reasons I'm attempting this is that I've acquired a helper to assist me with drafting my own top patterns!


Isn't she beautiful? Her name is Mabe, and I still need to add some padding and cover her in fabric. I found her at a hole-in-the-wall fabric store in Toronto for $30! She looked so lonely in the window, I had to bring her home.

She's already been amazingly helpful. It's so much easier to drape and structure fabric pieces when you have something to hang it on, other than yourself!

The first thing I did was sketch a quick drawing based on the top from ModCloth. I may add pleats instead of gathers. The good fabric planned for this top is a little stiffer, and small pleats would look much neater than messy gathers.


It's pretty obvious that I'm not an artist, but trust me, this is one of the better sketches! Using myself and Mabe, I figured out the dimensions needed for the front and back yoke, and used loose-leaf paper (I'm a student, give me a break, loose-leaf paper is cheap) to created the pattern pieces. I cut them out from the other half of the sheet I used to make the muslin for the pants I also mentioned in the previous post.


By positioning the front and back yoke on Mab, I was able to easily figure where the shoulder seam should go, which was handy because the back yoke edge was wonky at the shoulder seam.

I'm still working out how to do the body of the top, but so far I've just cut out rectangle pieces of fabric for the front and back body, with width equaling the widest part of my bust. I gathered the top part of the front body and sewed it to the yoke.


Tomorrow I'll attach the back piece, then putz around with the sides and figure out how to deal with them. I like the straight line along the side from the yoke to under the arm, and will try to maintain this. I may also need to flair the waist at the hips.

All and all, this muslin is coming along nicely, and if it works, I'll be sewing it in the fabric below. I think it'll be a charming little top!


I have to say, drafting your own pattern like this is much more fun than sewing from a company pattern! Hopefully it works out. :)
Related Posts Plugin for WordPress, Blogger...