I've been working hard on
my entry for the
Refashion contest over at PR, and taking a whole whack of pictures. I'm serious, a Whole Whack of them. I'm going to share all the fun I've had with taking apart and cutting out pattern pieces from this leather coat
DECONSTRUCTION:
I noticed a lot of neat things about this jacket while taking it apart. Some are design features, other are construction methods, and I thought I'd share some of my favourites here.
This leather jacket is made up of smaller leather pieces seamed together. One of the things that impressed me was how they incorporated the slit (???) pocket and bound buttonhole along the seamline at the hip. I thought this was a great idea, and really shows the quality of this jacket (it's by Danier, btw, and the leather is so soft and supple).
I like that they included a piece of leather inside the pocket so that you don't see the pocket lining fabric from the outside of the coat. I learned this lesson on my
corduroy jacket's welt pockets, but it's nice to see a good example of how such a little detail can make such a difference. Especially if your pocket lining material is bright.
Because the bound buttonholes were so thick, they made a tall shank at the base of the buttons, and then anchored the button with a smaller one of the backside for more support. If I were doing buttons on my jacket, I'd definitely use this trick to avoid tearing through the leather. Plus it's a bit cleaner looking on the underside.
Love how their collar turned out. The points are so sharp! Impressive considering how bulky the leather can be.
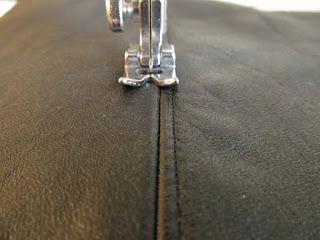
You can also see how they topstitched the horizontal seamlines and left the vertical seams alone. This tends to emphasize the horizontal seams and lets the vertical seams disappear a bit more, which helps prevent a patch-quilt sort of look
On the inside, I noticed that all of the seam allowances were glued down, and the horizontal seams were all interfaced. Not sure about the reasoning for the latter, but I totally stole the former idea. It's really helpful because you can't actually iron down the seam allowance at all.
I admit, I stopped and petted the suede inside for a while. SO SOFT!
They bagged the lining, and managed to make both the bottom hem and sleeve hem with no stitches. I was impressed with how they did this without the hem dropping at all.
Turns out the answer is some sort of interfacing (web? woven? I don't know my interfacings) along the hem where it folds up, and then glue the heck out of the hem. I guess this provided some stability (with leather?) or perhaps kept the fold sharp (???), and the glue helped hold it in place. Totally stealing this idea.
RECONSTRUCTION:
So basically, I ripped off the lining, dropped the hem and opened the facings, took off the sleeves and collar, and split the shoulder seam to make a flat piece of fabric. You can see the first piece laid out on the jacket: the front panel. It was supposed to be cut on the fold so that it's self-faced, but I couldn't do that with my fabric. I chose to cut out 4 of the front panel and sew two together.
Except there wasn't enough space to cut the facings directly from the jacket. I'd have to patch it.
 |
Hacked off the pocket section
|
 |
| Used binder clips to hold leather pieces together (can't pin leather or else the pin marks would be noticeable) |
 |
| Try to line up vertical seamline |
 |
| Stitch, then trim and glue down seam allowance |
 |
| Topstitch on either side of seamline |
 |
| Notice afteward that your vertical seamline weren't aligned. Give up and cut out facing piece |
Of course, then I messed up.
I forgot to take pictures, but you can see my whining about it over on the contest discussion boards.
The biggest problem was that getting all the pieces I needed was going to be tight as it was. I actually had to walk away from this all for a couple days because of how upset I was.
When I came back to it, I started on the upper part of the two piece sleeve, which was going to be in leather. I cut it out from the original jacket's sleeve, but had to patch on a piece to the bottom due to the pattern sleeve being a bit longer and the grossness of the original jacket's sleeve hem. Used the same method as above.
This leather, btw, is beautiful to work with. I've been using size 12 sharp needles instead of leather needles, and there hasn't been any problems. Well, there was one, but I'll talk about that in a sec.
Once I got through the sleeves, I went back and frankensteined a new inside facing, being extra cautious to cut it the right way. You can see the new frankensteined facing piece on the left above, and the front panel on the right. I took great care to make sure that the two front panels matched as much as possible, and that the seamlines for the patched facings were not lined up with the seamlines of the front panels to reduce bulk.
I then stitched the front panel and facing together. I don't have pics here right now, but I had two problems with this:
- The seam curves a bit inward at the top and bottom, so the whole front line of the jacket looks a bit curved. I decided that I can live with this, because unpicking leather is hard.
- I chose to topstitch along the edge of this seam, and I broke a needle half way going over the fankensteined facing seamlines. Oh well, I'll just use a stronger needle next time.
I forgot to mention, but before stitching everything together, I decided to freshen up the leather a bit. Many internet sources suggested using a mix of lemon juice and olive oil, so I did just that. The lemon juice cleaned the leather, and the oil added moisture. The test strip above was taken from directly adjacent to the piece it's laying over, and you can see the difference it made!
This is all that's left of the jacket after I was through with it. Unusable scraps to the right, and possibly useful pieces to the left. And in fact, I'm going to have to get the 4 triangular shoulder yokes from these scraps somehow because there is literally none of the wool jacket left to cut them out.
I'm a bit proud of how I've managed to use up all the material from these jackets! Let's hope that the final result turns out. If it doesn't though, I've learned a heck of a lot on this project. :)
If you managed to get through this extremely long post, thanks so much for your patience! I didn't realize it would be such a beast until I was half-way through it.


Very interesting. I had to take apart jackets for my contest entry too and really
ReplyDeleteLearned a lot in the process. Good luck with the remaining pieces and looking forward to seeing your final item!
Really impressive. I am about to make a jacket and am kind of freaked out.
ReplyDeleteJackets aren't too bad, but there's a lot of details to them that can be tricky. If you have any books on tailoring (espcially if it's a more complicated), I'd recommend looking it over. What jacket pattern are you planning to make?
DeleteI'm making Vogue 1198 - a OOP motorcycle jacket by Sandra Betzina. I have wool to make it, but I'm unsure if I will line it. Not because I'm lazy, but because it is a bit eccentric to have a wool jacket in Houston where it never gets below 50 degrees.
DeleteI can see you've picked a lovely quality piece of leather to refashion. Mine was good but I can tell yours is worth working on.
ReplyDeleteIt's lovely to give this leather a lift with the lemon juice and oil mix.
I'm looking forward to seeing your wonderful leather jacket soon.
Thanks! I knew as soon as I touched the jacket sleeve on the rack that I wanted to work with it. I wasn't suprised to see it was Danier, except when I totally was because OMG DANIER LEATHER! lol
DeleteIt's looking really good! I've always put sewing leather in the too hard basket but you're flying through it! Can't wait to see more
ReplyDeleteThanks! Leather is a lot easier than you'd think, or at least, this leather has been. It's pretty thin and soft, so it's not really giving me much issues except where there's more than 4 layers of it. The hardest part is the fact that you can't pin it, but binder clips work really well. That you can glue down the seam allowance makes it even easier than pressing the seams, because these stay down!
DeleteGreat post! It's really interesting to read about your discovery with the details, such a neat way to learn about how to do things. I've never sewn leather, but it's been on my "maybe" wishlist for years! I'm looking forward to seein the end result. Good luck!
ReplyDeleteThanks so much! It's fun deconstructing garments, you learn so much. It's how I worked out how to attach collars, taking apart men's dress shirts. :D Leather (or at least this stuff) is much easier to work with than you'd think. You just have to watch out for bulk.
DeleteGreat looking jacket! I love the idea of mixing the wool and the leather. Thanks for the tip on how to clean old leather. I have an old jacket that I will definitely try that on!
ReplyDeletenice post love it
ReplyDeleteJust found this, was wondering if you have attempted combining knit and leather?
ReplyDeleteLove your walk-through and tips. I'm about to begin deconstruction on a leather jacket and I'm planning on combining some of the leather with crochet pieces. Looking for recommendations on yarn weights, fiber contents, and also ideas for a liner.
Thanks so much for all the tips! I should have read your post before attempting my thrifted leather jacket refashion. I'll definitely keep this post handy the next time I sew leather.
ReplyDeleteLarge clothing factory specializing in the production of various fashion jacket for women.It’s at the store online@20880.com.
ReplyDeleteI found that site very usefull and this survey is very cirious, I ' ve never seen a blog that demand a survey for this actions, very curious... Ladies leather jacket
ReplyDeleteThis comment has been removed by the author.
ReplyDeleteL:eather belt price in pakistan
ReplyDeleteBrown leather belt for jeans
ReplyDeleteThank you so much for having such a nice and entertaining stuff for us. I really enjoy your blog and the way you have describe your content.
ReplyDeleteFEATHER JACKET REPAIR
This blog resolved all my queries I had in my mind. Really helpful and supportive subject matter written in all the points.
ReplyDeletewedding dress alteration near me
I liked your blog! It is really helpful and useful. Your post covered interesting facts. Thanks for sharing this with us.
ReplyDeleteCUSTOM MADE PROM DRESS