I should be knitting the three projects I really need to finish in the next month. But I'm frustrated by all three projects (especially the toddler sweater I need to restart for the third time.
So instead, let's play with some gorgeous Liberty of London fabric I ordered from Hyggeligt Fabrics and a TNT shirt pattern!
Showing posts with label fabric. Show all posts
Showing posts with label fabric. Show all posts
Friday, March 28, 2014
Tuesday, September 3, 2013
Alaskan Treasures!
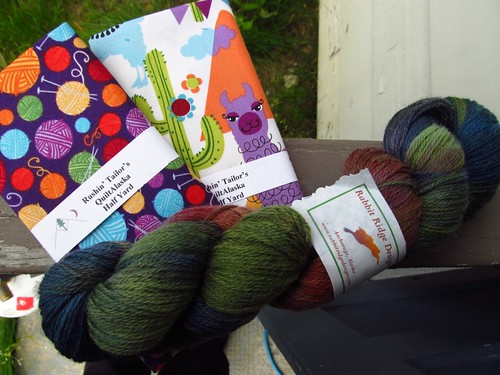
Look at my crafty finds from a recent trip to Skagway, Alaska!
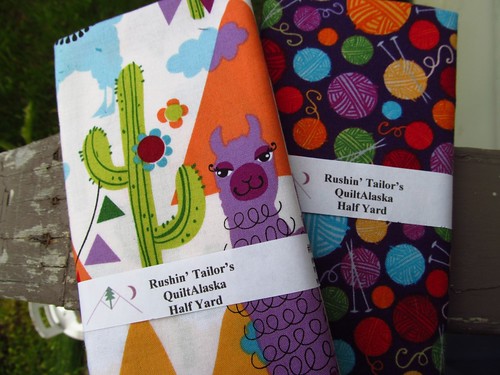
Love the cheeky alpacas on the one piece! I'm planning to make a case for my double point knitting needles soon, and was tickled to find knitting themed fabric. These two were my favourites, although it was a tough choice.
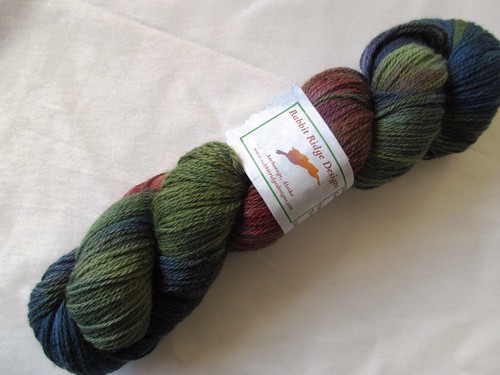
Also hard to choose was my yarn. I wanted to bring home something special as a souvenir from my Skagway trip, and spent a lot of time wandering around Changing Threads, fondling all the pretty Alaskan yarns. Finally settled on this sock-weight yarn with accompanying sock pattern.
Realized when I got home that it's extremely similar in colour to another yarn skein I picked up a while back.
Oops.
Friday, June 7, 2013
Shopping Down East: Fabric
Remember when I mentioned that I was heading down east for a geoscience conference my last time out? Well, it was awesome. It was fantastic to see family after a year away and two of my best friends after almost 2 years(!!), so nice to discuss Real Science® with people whose eyes don't glaze over in boredom.
And so nice to go fabric and yarn shopping in good shops!
Look what I found! From left to right:
I think she was amused by the basement of Mitchell's, which is full of vintage fabrics, butt-ugly fabrics, and fun fur. And you know what? I finally broke down and bought some of the ugliest fabric in that basement:
ISN'T IT GREAT!! (And by 'great' I mean 'god awful', but in a great way!) It's literally from the 70's, and I've been pawing it every time I walked into that store. In fact, you can see it in this post from 2011. I don't actually think it's ever moved off of that one shelf, come to think. I'm going to make a Hummingbird top out of it.
Seriously.
What do you think of my fabrics? I totally bought them all thinking of all the pretty Cake Patterns winging their way to me! Would you buy butt-ugly fabric if it called out to you? And if so, would you use it?!
And so nice to go fabric and yarn shopping in good shops!
Look what I found! From left to right:
- Raspberry coloured...thin...cotton knit...something?? Oh goodness, I can't remember what this is. Good start, Heather.
- Uh...poly-lycra? no wait, uh, poly-rayon...something, BUT IT'S POLKA DOT SO WHO CARES.
- Purple ponte de roma, which I'm excited to work with because I hear good things about it (plus the colour is gorgeous).
- French terry in plain old black, because it may be boring to work with but it's an important staple in my wardrobe. Plus I kept coming back to it and fondling it disturbingly.
I think she was amused by the basement of Mitchell's, which is full of vintage fabrics, butt-ugly fabrics, and fun fur. And you know what? I finally broke down and bought some of the ugliest fabric in that basement:
 |
| Over corrected the colours and hit save instead of undo. DOH! |
Seriously.
What do you think of my fabrics? I totally bought them all thinking of all the pretty Cake Patterns winging their way to me! Would you buy butt-ugly fabric if it called out to you? And if so, would you use it?!
Friday, April 19, 2013
Local Fabric Shop Challenge: Laurel Top
Okay, so it's not a secret that I'm not a fan of our only local fabric shop. It's got a crappy, overpriced fabric selection, especially considering that most of the bolts don't even have fibre content on it. But now that our local yarn shop has closed (WAAAAAAAAHHHH D:), I'm determined to at least appreciated the fabric shop more, dammit.
I challenged myself to not only buy the fabric I need to make a wearable muslin for Colette's Laurel, but to also use some sort of trim from their admittedly large and pretty selection. I tend to just oogle them and move on.
My main fabric is a boring broadcloth in a lovely shade of green (it's more yellowish in person - my camera hates green). I chose broadcloth and I really didn't want to dish out too much cash on this version. The trim is what makes it fun though, and I love it! I'm going to use it along the hem of the Laural top. I think. Maybe.
Anywho, that's my tentative plan for the weekend. And don't think I've forgotten about my pants! I've been thinking of nothing less for the last two weeks. But this pattern has sort of shanghied my imagination and won't let go, and I want to try out the top first before diving into the dress I plan to make down the road. :)
Friday, January 4, 2013
Project Planning Yo!
I am itching to sew, it's a little bit ridiculous. Well, I guess not considering how little of it that I've been able to do lately (Hitchhiker's Jacket just wet my appetite).
I'm moving today. Tonight, I'm setting up the basics of my new sewing room (more info on that later), and tomorrow (hopefully), I'm sewing my own version of the Tiramisu! I'm so jealous of all of you who have been making it lately.
It'll be made out of this denim-like knit. I'm actually surprised to have found it in our local fabric store, since their knit fabric selection fits on one 3 foot shelf (and there's a lot of rib knit and polyester on that shelf). I took home the last 2.5 m of it. I don't want to think about how much it cost me, thanks.
AND, I bought wool to start knitting myself a sweater. Uh yeah, today was not a good day on my bank account. Haha oh well I HAVE A JOB NOW. Anywho, it's Cascade 220 Heathers (\o/), in a lovely burgundy with blue fibres spun throughout. I love it! Also, it was one of the only colours that had enough skeins for my project. I'll share more about the pattern another time.
So yay, creating again! I'll keep you posted about the Tira progress tomorrow. :)
Sunday, November 11, 2012
Thrifted Leather Jacket: Deconstruction and Recreation (Pic Heavy)
I've been working hard on my entry for the Refashion contest over at PR, and taking a whole whack of pictures. I'm serious, a Whole Whack of them. I'm going to share all the fun I've had with taking apart and cutting out pattern pieces from this leather coat
DECONSTRUCTION:
I noticed a lot of neat things about this jacket while taking it apart. Some are design features, other are construction methods, and I thought I'd share some of my favourites here.
This leather jacket is made up of smaller leather pieces seamed together. One of the things that impressed me was how they incorporated the slit (???) pocket and bound buttonhole along the seamline at the hip. I thought this was a great idea, and really shows the quality of this jacket (it's by Danier, btw, and the leather is so soft and supple).
I like that they included a piece of leather inside the pocket so that you don't see the pocket lining fabric from the outside of the coat. I learned this lesson on my corduroy jacket's welt pockets, but it's nice to see a good example of how such a little detail can make such a difference. Especially if your pocket lining material is bright.
Because the bound buttonholes were so thick, they made a tall shank at the base of the buttons, and then anchored the button with a smaller one of the backside for more support. If I were doing buttons on my jacket, I'd definitely use this trick to avoid tearing through the leather. Plus it's a bit cleaner looking on the underside.
Love how their collar turned out. The points are so sharp! Impressive considering how bulky the leather can be.
You can also see how they topstitched the horizontal seamlines and left the vertical seams alone. This tends to emphasize the horizontal seams and lets the vertical seams disappear a bit more, which helps prevent a patch-quilt sort of look
On the inside, I noticed that all of the seam allowances were glued down, and the horizontal seams were all interfaced. Not sure about the reasoning for the latter, but I totally stole the former idea. It's really helpful because you can't actually iron down the seam allowance at all.
I admit, I stopped and petted the suede inside for a while. SO SOFT!
They bagged the lining, and managed to make both the bottom hem and sleeve hem with no stitches. I was impressed with how they did this without the hem dropping at all.
Turns out the answer is some sort of interfacing (web? woven? I don't know my interfacings) along the hem where it folds up, and then glue the heck out of the hem. I guess this provided some stability (with leather?) or perhaps kept the fold sharp (???), and the glue helped hold it in place. Totally stealing this idea.
RECONSTRUCTION:
So basically, I ripped off the lining, dropped the hem and opened the facings, took off the sleeves and collar, and split the shoulder seam to make a flat piece of fabric. You can see the first piece laid out on the jacket: the front panel. It was supposed to be cut on the fold so that it's self-faced, but I couldn't do that with my fabric. I chose to cut out 4 of the front panel and sew two together.
Except there wasn't enough space to cut the facings directly from the jacket. I'd have to patch it.
 |
| Hacked off the pocket section |
 |
| Used binder clips to hold leather pieces together (can't pin leather or else the pin marks would be noticeable) |
 |
| Try to line up vertical seamline |
 |
| Stitch, then trim and glue down seam allowance |
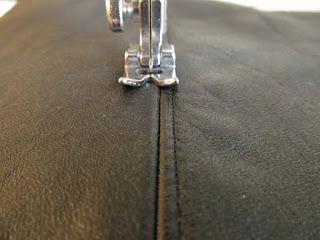 |
| Topstitch on either side of seamline |
 |
| Notice afteward that your vertical seamline weren't aligned. Give up and cut out facing piece |
Of course, then I messed up.
I forgot to take pictures, but you can see my whining about it over on the contest discussion boards.
The biggest problem was that getting all the pieces I needed was going to be tight as it was. I actually had to walk away from this all for a couple days because of how upset I was.
When I came back to it, I started on the upper part of the two piece sleeve, which was going to be in leather. I cut it out from the original jacket's sleeve, but had to patch on a piece to the bottom due to the pattern sleeve being a bit longer and the grossness of the original jacket's sleeve hem. Used the same method as above.
This leather, btw, is beautiful to work with. I've been using size 12 sharp needles instead of leather needles, and there hasn't been any problems. Well, there was one, but I'll talk about that in a sec.
Once I got through the sleeves, I went back and frankensteined a new inside facing, being extra cautious to cut it the right way. You can see the new frankensteined facing piece on the left above, and the front panel on the right. I took great care to make sure that the two front panels matched as much as possible, and that the seamlines for the patched facings were not lined up with the seamlines of the front panels to reduce bulk.
I then stitched the front panel and facing together. I don't have pics here right now, but I had two problems with this:
- The seam curves a bit inward at the top and bottom, so the whole front line of the jacket looks a bit curved. I decided that I can live with this, because unpicking leather is hard.
- I chose to topstitch along the edge of this seam, and I broke a needle half way going over the fankensteined facing seamlines. Oh well, I'll just use a stronger needle next time.
I forgot to mention, but before stitching everything together, I decided to freshen up the leather a bit. Many internet sources suggested using a mix of lemon juice and olive oil, so I did just that. The lemon juice cleaned the leather, and the oil added moisture. The test strip above was taken from directly adjacent to the piece it's laying over, and you can see the difference it made!
This is all that's left of the jacket after I was through with it. Unusable scraps to the right, and possibly useful pieces to the left. And in fact, I'm going to have to get the 4 triangular shoulder yokes from these scraps somehow because there is literally none of the wool jacket left to cut them out.
I'm a bit proud of how I've managed to use up all the material from these jackets! Let's hope that the final result turns out. If it doesn't though, I've learned a heck of a lot on this project. :)
If you managed to get through this extremely long post, thanks so much for your patience! I didn't realize it would be such a beast until I was half-way through it.
Tuesday, October 16, 2012
Re-Fashion Contest: Planning and Original Items
Okay, I know I haven't been blogging much and sewing even less, but I'm determined to do this! I really want to make this Burda jacket I blogged about a while ago:
And I just happened to find these two thrifted jackets:
LOOK, A DANIER LEATHER JACKET!!! It's knee length and nearly fits me. I'd leave it as is except that there's some wear and damage in some areas and the button holes are stretched out. Found it at a garage sale raising money for a child's cancer treatments. It was by donation, so of course I emptied my wallet for the jacket. Think I paid about $25 bucks for it, and I probably would've paid more if there was anything left in my wallet. Even so, I have no quams with cutting it up!
I found the Nygard wool jacket for about $6 at our (awful) Salvation Army thrift shop. I didn't realize until I got home that it smelled like it'd been in a house fire, and after a couple washes it took a 12 hour soak in very soapy water to get the smokey smell out. Definitely a stubborn making-do moment.
I even started tracing out the pattern from the September Burda issue.
Uh...I got the two sleeve sections traced. It took 2 hours. I can't find any other pieces... Um, I'm really glad I have a couple more weeks to get this all traced out. ...Maybe I should just make a wool and leather stuffed guitar...
Anyways, that's my plan for the refashion contest! I need to figure out a lining fabric still, and pick up a metal zipper, and decide what colour I'm going to do the hand stitching in (because I'm totally including that part). I'm leaning toward blue or burgundy, just for some colour. Or just a cream. What do you think?
*~*~*
This picture is actual for Tanit-Isis. It's the back of the leather jacket (see what I mean about the wear on the left hip there?). I'm including it because the amazing full-length coat she sewed for her husband was damaged when it got stuck in the back wheel of his motorcycle. Luckily he wasn't hurt, but the back got ripped off. Also luckily, it's only the one side, and ends at about the hip.
When I was taking pictures of this jacket, I noticed the seamline across the hip (done because it's difficult to get large pieces of leather), and I thought it might be a possible fix for Mr. Isis's coat. Not as pretty as a continuous piece, but a possible way to keep the coat length. If, of course, she has anymore fabric... I figured I'd share it anyways. :)
Friday, August 17, 2012
Look at What Arrived in the Mail! (ahem, last week...)
The lovely Kristin from quiet and small: adventures in ph.d-land purged some of her fabric and pattern collection a while back, and instead of doing the easy thing of donating them, she offered them up - first come first served style - to her readers! And I jumped all over that. Because I totally need more fabric and patterns.
I liked the simplicity of the, erm, Simplicity pattern, especially that adorable peter pan collar. It doesn't include a lot of shaping, but the size matches my upper bust, and I figured I could add some waist darts if needed while I do the oh so needed FBA. Or I'll just try tucking it in. I've been liking that look on me lately!
Kristin was trying to entice Tanit-Isis or Oonaballoona to take this one, but I was greedy and scooped it on them. How can I resist those colours?! I'm determined to have a more colourful wardrobe this winter, since oh ho hello there 24 hour nighttime. I'll need some brightness to keep me smiling! Plus it sort of reminds me of the northern lights that's going to totally make up for the lack of sunlight. Kristin also threw in the black bias tape, which will be perfect for the blouse I have in mind for this. Not sharing that with you yet though, because I have a bad habit of changing my mind as soon as I say what I'm going to do. Haha um, not so good for wardrobe planning.
This is what I think is a vintage knit. It's thin and has a lovely texture, and I'm considering making a long-sleeve t-shirt with some pintucks at the neckline or something. But now that I've said that, it'll probably become something else entirely. Isn't the colour lovely though? I'm loving this mustard yellow lately. So pretty!
Thanks for the fabric and pattern Kristin. I'm eager to get my scissors and needles into them!
Watch out for my next post, where I show you how I plan to sew in a tiny room, which also serves as a change room, library, workspace, and oh yeah, my bedroom. Goodness grief, this is going to be interesting.
Tuesday, March 20, 2012
Shopping Spoils + a Birthday Giveaway!

It's my birthday this Friday, and Mitchells Fabric was kind enough to offer a 25% sale this past weekend in honour of it! Understanding of course that I'd be far too busy celebrating to have a chance to shop this weekend. Considerate of them, eh?
And because it's always more fun to shop with a friend, I dragged my sewing buddy Sheila out to the sale on Sunday. She has a Will of Steel though, and managed to not buy anything. *GASP* I know, I'm as shocked as you all are. It's a sale! You're supposed to make unwise fabric purchase decisions!
Although this could possibly explain some of the disasters in my fabric stash.
ANYWAYS, this is what I walked away with:
 From top left corner, clockwise: 3 m of 60" wide light-weight interfacing; 3 m of vintage 100% cotton (it's only labeled as "vintage". Oh Mitchell's, I love your wacky basement selection); 4 m of mousseline cotton for lining things; New Look 6107; and 0.4 m of cotton lace. Not too much damage, if a little boring.
The shirt pattern was a bit of a fluke, actually. On Saturday, I stopped in at a little boutique in the village. I fell in love with this blouse they had on display, but when I tried it on, it was more than a bit of a disaster.
 What is with the wings?! I suspect it's meant to be worn tucked in or with a belt, but there's no way I was dishing out $95 for this hot mess.
But it had some sweet details, and I snapped some pics to remind me to incorporate them into something. Someday.
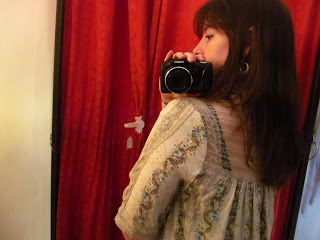 Actually, I love the back, with all the soft gathers and the pretty lace yoke. Not so much with my black bra strap though, sorry about that.
I don't know, there's something about the soft floral print and the pretty lace details, never mind that length of sleeve. Mmm pretty. Shame the rest of it was so gross.
Well, on our Mitchell's adventure, I was keeping an eye out for lace that would go with a piece of Springy floral fabric I have, half thinking of altering a pattern to include a lace yoke on a blouse. I idley flipped open the New Look pattern book, and what did it turn to but this:
 Well then, it was just meant to be! It has soft gathers where the fashion fabric meets the yoke on the front, and I may draft in some gathers for the back as well, since I think it looked so pretty in the inspiration blouse.
 Here's a closer look at the lace I found, along with the blouse fabric and some pearly buttons I picked up last year at a thift shop. Doesn't the whole thing scream frilly girly blouse?! I can't wait to work on it!
Now, that black, yellow and white wild piece may be familiar to some of you. Last summer, I brought you guys along with me on another adventure at Mitchells, and this print was in one of the photos. I hadn't even noticed it until a bunch of you
 On Sunday, I finally had enough. And one of you lucky readers will benefit from it!
Happy Heather-is-Getting-Old Giveaway!
 In honour of my 31st birthday (dear me), I'm giving away 3 m of this vintage 100% cotton cloud/popcorn printed fabric. It's light-weight and a bit sheer, and while it has a slightly stiff hand right now, I think it'll soften up beautifully once it's prewashed.
Just leave a comment below with your email address and maybe what you'd considering making with this fabric. I'll draw a name this Sunday at 12 noon Winnipeg time. I'm willing to ship internationally so anyone can sign up!
Happy Sewing All!
Subscribe to:
Posts (Atom)


