Wednesday, April 24, 2013

Goodies in the Mail!


Getting this in the mail totally made my day!
Clockwise from left: cute little round zippered bag, silk thread, twin needle, clear elastic, mystery grey binding (same as blue?), and hug and snug binding.
Thanks for the goodies Suzy!  It was fun receiving mail from Australia!  :D  I'm excited to try out the different bindings and clear elastic - I've never used either and don't have access to them here in Yukon (until I finally breakdown and start ordering supplies online - that day looms closer and closer on the horizon).

Happy sewing (or, as I'm obsessed with lately, knitting) everyone!

Monday, April 22, 2013

No Sewing, but Pretty Pictures and a Weepy Tale.

No sewing was done this weekend because my boyfriend suggested escaping the snow and driving down to Skagway, Alaska for hiking, and how can a girl refuse that?

Old train along the White Pass. We're near the Chilkoot Trail, which we're planning to hike this summer.
The Boyfriend in front of the Frozen Reid Falls - gorgeous! (And so are the falls)
I did take knitting along for the 3 (*coughtwocough*) hour drive. Got a lot of my Owls sweater done too.  Except, I tried it on this morning...

IT'S TOO DAMN BIG!!!  WWWWWWWAAAAAAHHHHHHHHH!!!!!!  D:  D:  D:  D:  D:  I even did a few gauge swatches to check that everything was okay, AND IT'S NOOOOOOOOTT.  *woe*

Here's my mourning picture before I rip it all back and go down a needle size.  :(

*weeps in the corner*

Friday, April 19, 2013

Local Fabric Shop Challenge: Laurel Top

Okay, so it's not a secret that I'm not a fan of our only local fabric shop.  It's got a crappy, overpriced fabric selection, especially considering that most of the bolts don't even have fibre content on it.  But now that our local yarn shop has closed (WAAAAAAAAHHHH D:), I'm determined to at least appreciated the fabric shop more, dammit.

I challenged myself to not only buy the fabric I need to make a wearable muslin for Colette's Laurel, but to also use some sort of trim from their admittedly large and pretty selection.  I tend to just oogle them and move on.

My main fabric is a boring broadcloth in a lovely shade of green (it's more yellowish in person - my camera hates green).  I chose broadcloth and I really didn't want to dish out too much cash on this version.  The trim is what makes it fun though, and I love it!  I'm going to use it along the hem of the Laural top.  I think.  Maybe.

Anywho, that's my tentative plan for the weekend.  And don't think I've forgotten about my pants!  I've been thinking of nothing less for the last two weeks.  But this pattern has sort of shanghied my imagination and won't let go, and I want to try out the top first before diving into the dress I plan to make down the road.  :)

Wednesday, April 3, 2013

Pants: V2.1 - Getting Better!

First of all, thank you so much to those of you who gave me fitting advice on my last post (including Lena who emailed me some advice and Suzy who sent me awkward fitting pictures)!  I was seriously floundering, and you all prooved how talented, skilled, and generous this community is.  THANK YOU!

I haven't quite followed all of their smart advice yet, but I wanted to show my progress before I disappear for 2 weeks for my next work rotation.

All I've done is drastically taken in the outer side seams - up to 2 inches in places.  I still need to take in the inner seam, but that'll have to wait until my next time out.  I will also, at some point, be lowering the front a bit (by hacking a bit off the top this time, but I'll alter my pattern for that later).  The raw seam allowance is sitting about as high as I want the waistband to be.  But they're already starting to look like wearable pants!

I just noticed how low the left side is. I think it's just drooped from running back and forth to the camera because it was fine earlier.
Well, from the front anyways.  The back needs a lot of work still, particularly lowering the back crotch seam.  I've also added two more darts to the back to reduce gaping.  Got some butt nipples going on there, but I'll fix that later.


There's still lots of fabric around the knees, but I think taking in the inner seam will help with that.  I also suspect I'll have to take it in a bit more from the outer side seam, but I want to resolve the back crotch issues before I do that, just to see what it messes with when I do.  Pants are complicated and messy.

Everything is just basted together, except one inside seam and the pockets.  Once all of my alterations are made, I'll mark up the right seamlines and trim down the seam allowance, rip it apart, alter my pattern, then sew it all together properly (and hope it goes together properly again).

Sadly, I now have to leave these be while I go back to work tomorrow.  :(  I wish I had a couple more days to work on these, but it's better to leave it alone and not try to rush the alterations. 

I guess.

You guys have a good and productive time sewing!  See you in a couple weeks.  :)

Tuesday, April 2, 2013

Pants: V2.0 - BLEGH


Sigh.

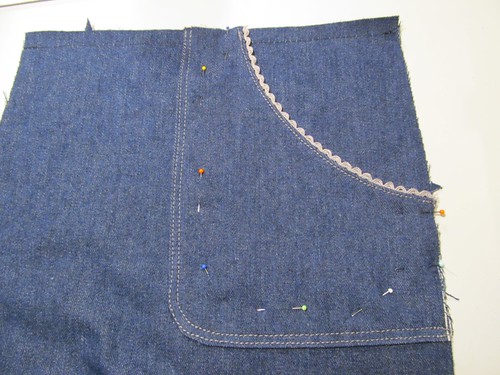
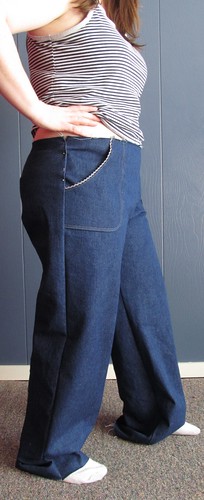
Okay, let's focus on the good points.  I spent some time playing with those patch pockets.  On my next pair, I'll definitely make them wider since the pattern includes a one-size-fits-all piece that just moves further and further from the centre seam, but I don't think it's too bad here.

I lined the pockets in some quilting cotton you may recognize from here and here, and trimmed them in some lace I found at a new-to-me Awesome Dollar Store in town.  Which, incidentally, has a better stocked sewing section than our only local (crappy) fabric shop.  OH RIGHT POSITIVITY.  I CAN DO THAT.


I'm pretty proud of the topstitching here!

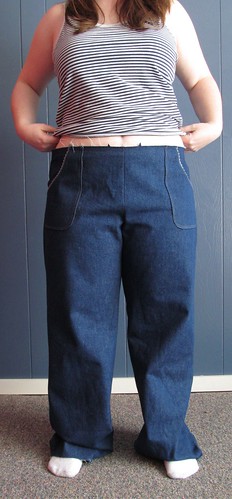
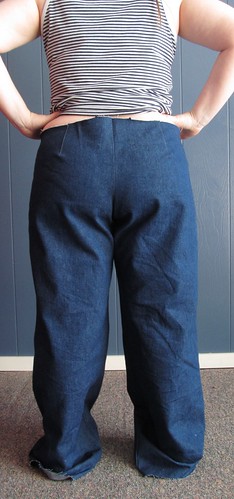
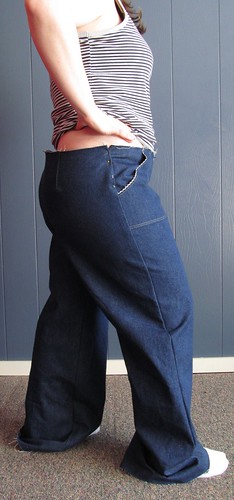
In regards to the pants themselves, it's not too bad, just obscenely big.  As I mentioned before, I graded up a size 16 pattern to size 20, which should've fit according to my measurements.  In fact, this size "fits" slightly smaller than me, but I figured it was close enough and I only wanted 2 inches ease in the hips instead of the built in 3 inches.  I've made these before, and they certainly didn't turn out this huge.

Although to be fair, I'm pretty sure I should've cut a size 18 instead of 16 back then.

Anyways, I'm just going to toss up all of the fitting photos I just took.  Then I'm going to go dig through all of my pants fitting books and see what they suggest.  The only thing I know for sure is that I definitely need to add two more darts to the back.  Any suggestions by you folk would be mucho appreciated.


ETA: I guess I should add some context here.  This is Simplicity 2367, and I definitely don't want a wide legged trouser.  I'd like it more fitted, closer to what it looks like when I literally pinch out 3-4 inches of fabric from the side seams.  Believe it or not, but these leg pieces are 2-3 inches narrower than my previously considered Simplicity 2562 pattern.  As in, each leg piece is 2-3 inches narrower. So glad I didn't go with that one.  I'm not sure if the leg width will be best resolved by just taking in the sides or if I should take in the inside seam too.  Or just for the back pieces?  I'm really not sure.

Like I said, any advice would be appreciated.  HELP ME PLEASE!!!
Related Posts Plugin for WordPress, Blogger...