Friday, December 30, 2011

OMG I'm Trying Pants (Again)

I know I've been really quiet as of late, both on my blog and on others. Between work being insane and the holidays, I haven't really been up to much on the sewing side of life.

But I'm dedicating tonight to sewing, and I can't tell you how excited I am about this! So of course I had to share.

I'm working on...wait for it...a pair of pants! My first pair since this disaster. No, it's not the trouser pattern I've been sitting on forever to make (mostly because it's the wrong size and also sort of complicated), but a simpler straight-legged version from New Look 6082.

I know I know, you're all saying "But Heather, last time you learned that the crotch-curve sucks on New Look patterns, especially if you have a huge butt", but whatever, I'm trying it out anyways. It's Stacie's fault for making her lovely clovers, and since I am obviously jealous of her straight-leg pants and want a pair of my own to fit into my knee-high boots (and don't actually own the clover pattern), I'm trying these.

Don't worry, I'm making (hopefully wearable) muslins, and have my copy of Pants for Real People sitting beside me as I snip and cut.

This is one of the first coordinate pattern sets where I actually love almost everything on it. I adore that cardigan jacket (the short version, the long looks too much like a lab coat to me), and am tickled that it's a woven! Might have to (for once) make multiple garments from this one.

Do any of you actually make multiple different garments from a coordinate pattern set?

And in lieu of anything productive to share besides some rambling, here's my slowly growing cross-stitch project. (Some photo editing since I suck at taking pictures, and then suck at editing. But the colours look more true this way, even if it is blinding.)

Sunday, December 11, 2011

Rush Order Christmas Party Dress

I've mentioned here and there (twitter, comments on other blogs, facebook, etc) that I was doing a sewing marathon yesterday, trying to finish off my Christmas party dress (never in the world thought I'd make myself a 'party dress', but that's how life goes sometimes) in time for my work Christmas dinner, and then a friend's party afterward.

Well, I get 'er done.

For a specific definition of 'done'.

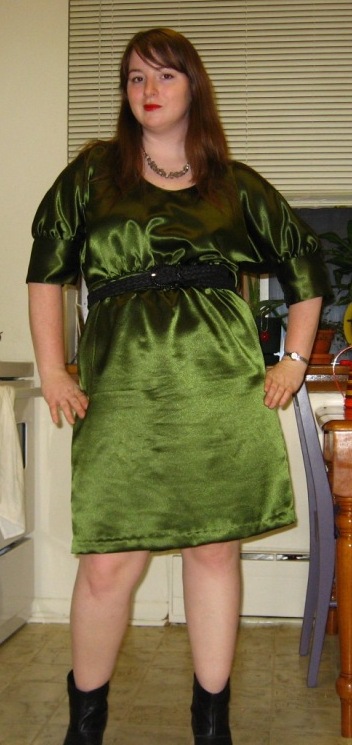
I decided a few months ago that I needed Simplicity 2305 - a Cynthia Rowley garment - out of green satin. This is probably the very first time I just wanted to make a pretty party dress. I think I need to make more, because dresses are awesome!

Anyways, I had most of the pieces cut out of a crepe-back satin by Friday night, and even attached the front and back bodice pieces. Saturday, I procrastinated...a lot, but after a short walk and a cup of coffee, I rolled up my sleeves and started sewing at about 11:30. And barely stopped until I finished the darn thing.

Of course, I finished at 6 pm, exactly when my work dinner was starting. BUT there's nothing wrong with being fashionably late, especially when you're wearing a knock-out dress!

I got tonnes of compliments on it, and loved people's reactions when I told them I'd made it. The best part, though, was when they asked how long it took me to make it, and I said 'um...today'. :)

Of course, I didn't point out all the problems with it. For one thing, the whole dress is too big. I cut a size 16 for the arms, 18 through the bodice and waist, and a 20 for the hips, as per my measurements. I should've stuck with a 16 for the entire bodice and an 18 for the hips. You can see in the two pics below how much nicer the dress would've looked if it was snugger around the waist.

And look! I did my first successful FBA! While the dress was big on me along the sides, the bodice was really comfortable, but not too baggy. I think if I hadn't done the 1 inch FBA, it would've been too snug and ill-fitted in the bust. Okay, I'm sold. It's wasn't even that hard after all, probably thanks to my copy of Fit for Real People.

I found the sleeves a bit too long. It'd look much nicer if the cuff ended just above my elbow, instead of hanging over it when I stand. Think next time I'll shorten the cut-on sleeves a bit.

Also, I did my very first invisible zipper...at 5:40 pm. I didn't even have time to do a practice run. It's not very invisible, but since it's on my side and covered by my belt and arm, I don't think it's that bad. Plus look at how well lined up that waist-band is! I'm that proud.

The zipper is really rough on the inside, but I just didn't have time to finish it. I'll have to though, because the satin frays like crazy when you simply look at it and even worse when you don't.

Most of the seams were finished in a mock serger fashion, using a tight zig zag stitch. I think this is my favourite finishing technique, since it's simple and strong.

I did take the time to hand stitch the hem, since I didn't want a visible stitch line along it. For a 10 minute job, it looked decent. This satin refuses to be pressed sharply, so it's a little poofy (as are all the seams).

I'd like to think I'll take the dress apart and at least take in the waistband and the skirt, but I probably won't. That's why belts were invented, yo! I wouldn't mind making another version of this dress, though. It's super comfortable to wear, looks awesome, and I don't think it's too distinctive of a pattern to have two versions of. I think it'd even look good as a day dress, if you use different fabric.

Here she is, inside out. I LOVE the crepe-back satin, and sort of wish I'd used the crepe side somewhere on the outside of the dress. Oh well, next time.

So despite all these problems and the rush, it was a successful dress (although next time I'm adding pockets). Now I just need to figure out how to wash satin, because I got a couple drinks spilled on me, and you can see the marks on the dress. :(

Oh also, look what I made while waiting for the cab to arrive! Cut out a circle of fabric big enough to contain your wallet and whatever else you need, tightly zig-zag around the edge and trim, zig-zag a length of ribbon on the outside, and voila, instant purse!

For more specific details on the dress (sizes, fabric type, alterations, etc), please check out my review over at PR.

Wishing you all a Merry Christmas and a great holiday, from me and my three little plant pets! (From left to right, Lowell the Aloe Vera, Tiny Tim the...tiny tropic, and Agetha the Aglaonema)

Sunday, December 4, 2011

PR Day 2011

Photo taken by Sheila. Bag owned by Brenda. That is, until I can sneak it into my purse without her noticing.

So ages ago (on November 19 to be exact), sewists around the world gathered to celebrate Pattern Review's 10th anniversary. While we were a small crowd (of three: Sheila, Brenda and myself), a gathering did occur here in Winnipeg.

From left to right: Brenda (aka goal100 on PR), me (Heather aka bare_bear), and Sheila (aka SheBear0320). Photo by Sheila's husband, who was a good sport, an ice cream enabler, and basically hid in his man-cave the entire time, poor man.

The celebration included:
  • tasty scones (ala me, extremely fresh out of the oven when Brenda arrived a bit early to pick me up while they were still baking away in the oven)
Mmm scones. Photo by Sheila.
  • tasty coffee (ala Sheila)
  • sewing chatter and oogling Sheila's sewing studio (I WANT HOMG)
  • full body measurements (yay I finally know how wide my shoulders are and what my crotch curve measurements are - the latter of which was extremely awkward to take, btw)
  • an excellent lunch at Mongo's Grill
  • FABRIC SHOPPING!
Our fabric haul. Photo by Sheila.
  • bubbly back at Sheila's place, then a tasty pizza dinner to stave off the effects of the bubbly
Mmm bubbly. Photo by Sheila.
  • and finally, an excursion for ice cream (did I mention it was something like -25C outside? That's just how we 'Peggers roll)
All in all, it was a fantastic day! Exhausting, but so much fun. The best part was meeting two awesome and talented Winnipeg sewists, even if they are horrible enablers. (Stop tempting me to go back to Northwest Fabrics, Sheila!)

Also, it turns out that Sheila has the best job in the world and sews for a living (hence her amazing sewing studio). She makes athletic apparel, most notably figure skating outfits, but is branching out to other sports as well. Please go check out her website Chianto by Sheila to see what she gets up to. Someday I'm going to convince her to hire me so that I can spend my days sewing too!

So we hit up three fabric stores that I didn't even know existed in Winnipeg. I'll bet you're wondering what I come home with, eh? I didn't go crazy, but I think I won the fabric race out of the three of us. I found some pretty black underwear elastic ridiculously priced at 10 cents/m at Economy Textiles, as well as a stack of quilting cotton. Need to go back there, because the prices are out of this world!

I found this lingerie pattern for wovens from a local woman at ...uh, I can't remember the name of the place. Not a huge selection of fabric, but they had some unique stuff, and the man who runs the place is apparently a wizard with sewing machine repairs. They also had a room in the back with some lovely pelts and leather pieces. Very cool.

Finally, I was done in at Marshall's/Northwest Fabrics, which is the biggest fabric store I've ever seen! Maybe it's about the same size at Mitchell's, but it's all laid out on one big floor, and everything is sorted according to fabric type. I obviously need to spend more time here, to uh...learn more about different fabric types. Yeah, that's it...

Despite being completely overwhelmed, I managed to pull my wits together enough to trackdown the wool and lining I wanted to make a winter coat. Aren't they pretty! I love the burgundy. That was entirely Brenda, because I was going to make myself get the black wool, and she talked me into going with what I was drawn to, which was the burgundy. It's a melton wool, and the black is a flannel-backed satin.

Obviously I need to fabric shop with other sewist more often. OR NOT, because youch I bought a lot of fabric! Thanks Sheila and Brenda!

And thanks, Pattern Review, for encouraging your members to celebrate and have fun for your 10th anniversary. Congrats on reaching such a milestone!

Thursday, November 24, 2011

Too Many Projects homg

Ever since I started work, my posting schedule has gone down the tubes. I have a post in the works about the PR Day a few of us celebrated here in Winnipeg, but that'll have to wait for the weekend when I'm less brain-fried from field work.

For now, I thought I'd share what I've been up to, and give an answer to the question I asked in my last post.

So you take this thing,

...add a 'floating' sink and some velcro,

...and you get this!

A really cute way to hide all your bathroom stuff when you only have a medicine cabinet for storage! And it helps make my very 50's pink bathroom look less frumpy and more fun. Add the perfect shower curtain and rug, and you get this:

Seriously, the bathroom started as the ugliest room in the apartment and quickly became my favourite. I have a bit more trim I may add to the skirt to fancy it up a bit more, but we'll see. Now I need to add a curtain along the lines of the sink skirt to my back-entry-facing window, and this bathroom will be perfect!

*~~*~~*

My cross-stitch project is coming along nicely. Okay, so I have a ways to go, but it's still fun to do and is easy to put away if I'm getting tired of it. The hardest part is remembering that it's there to work on, since I'm very 'out of sight out of mind'.

*~~*~~*

Haven't been sewing much, but tonight I started a pair of panties from a t-shirt, sort of like the ones I made before. I was put off doing them after I received a very creepy email from someone about them, but I figured forget them. I'm not letting some internet creep keep me from making something fun, and it's also not going to keep me from sharing it with you. You just wont ever see me modeling them!

Anyways, I finally just put on a movie (Sense and Sensibility) and traced out the Team Canada pair that I love and wear as often as I hygienically can. They are, without a doubt, my favourite and most comfy panties, and I need more of them. Hopefully this copy will be just as comfy.

I'm even thinking of putting my new-found cross-stitching skills to use and making a pretty flower on them, since this pair is a little plain.

*~~*~~*

I started a top using this fabric ages ago, part of a series I was planning to make and post about. I may still do that, but this UFO has been sitting here needing the sleeves eased in since way before I started my job last September. I adore the fabric, the fit is fantastic (nearly perfected from an earlier version), and it's nearly done, has been nearly done for ages. Why can't I just get these sleeves in already?! SHEESH.

*~~*~~*
This doesn't even include the projects I want to start...now. Including a winter coat, although I'll get into that more this weekend. Never mind the Christmas presents I have in mind! ACK!

*~~*~~*
I know I'm not the only one who has too many projects on the go. How many do you guys have on your sewing table?

Here's to finishing them up!

...Someday.

Sunday, November 13, 2011

Guessing Game: What Am I Making Now?

I'm not sure if I'm in the office or in the field next week, so there may or may not be sewing this week. Here's a preview of what I'm working on. Is it flapper dress? Fringed top? Wig? Really strange hat? What do you think it is? :)

*~~***~~*

In other news, this was my favourite outfit last week, and surprise surprise, it's at least half me-made. The top is the Grecian Sundress (shirt version), a pattern created by Tanit-Isis (and it's free, so go download and make, because it's fabulous). The skirt was from the Wardrobe Contest 2010, my denim pencil skirt, which is probably one of my favourite garments ever made. All it needs is some pockets and it'd be absolutely perfect!

Heh, and the boots were found at Value Village, brand new with tags intact, for $14. Sweet! The cardigan is RTW from...somewhere from the mall? I've had it for ages, and it probably needs to be replaced soon.

Have a good week everyone!

Saturday, November 12, 2011

Finished Object: Good Nightie

After languishing in my stash for ages, I finally made a night gown using Simplicity 3573 (in my stash since last spring, I think), and a flannel sheet I thrifted a year or more ago. In fact, I was so determined to make it into pj's that it came back with me from Kingston, Ontario, and it was a bulky bugger, too! I think the only reason I have this nightie now is because I joined up with the PR Pattern Stash contest, which encourages you to use those old patterns that have been collecting dust in your stash.

When I finally pulled it out to use, I discovered one of the disadvantages of using thrifted patterns: most of it was missing - including the instructions. Obviously I need to pay more attention when thrift shopping. But I wasn't too worried because it had the front bodice piece, the front skirt, the back skirt, and the sleeves.

Okay, details. I decided on view C (the green stripe on the left). I cut a size large, which actually ended up quite loose. I know they're supposed to be loose pj's, but I was looking for something a bit more girly. I think it'd be too big, if I hadn't done a whole whack of modifications to it. More on that below.

It wasn't until I had most of it cut out that I realized that I was also missing the back bodice. No worries though, I just used the back bodice from Simplicity 2599, a pattern I've used before and am pleased with the back piece. I simply shortened it to the bodice length. (Sorry, I forgot to take pictures of the back piece.) When I attached the back and front bodice pieces, I sort of fitted it to Mabe the Sewing Assistant, which meant off-setting the seams a bit.

I also added some vertical bust darts, because this thing is a little (*coughalotcough*) shapeless, and wouldn't work well with my curves at all. Did I mention wanting a girly nightgown? Okay, maybe I should've said womanly nightgown! Anyways, I nearly added some horizontal darts too, but I realized that would be a little bit ridiculous for pj's. The vertical darts wound up a little bit too long, but I'm fine with it.

I'd also lengthened the shoulder part on the bodice. When I tissue fit the piece, I found that the shoulder seemed a little low. I figured I'd lengthen it and pinch out what I didn't need. I think this is why my sleeves eased in really well, and didn't have the poofy sleeve cap shown on the envelope. I'm quite pleased about this, to be honest. I hate poofy sleeve caps. I suspect it also is the reason the arm hole is really comfortable and doesn't bind at all. Going to keep that in mind for the future.

I really like how the sleeves turned out! They're very comfortable and doesn't restrict motion at all. To get the subtle gathering at the end of the sleeves, I simply used 1/8 inch elastic at the desired length, tied it into a loop, marked out and lined up the 4 'corners' on both the sleeve and the elastic, and stitched it to the outside, stretching the elastic as I went. I considered sewing it on the inside, but I didn't want the elastic against my skin.

I ran into two problems, though.

Problem 1: The seam between the bodice and the skirt wound up really wonky!
I don't know how this happened. Renren at PR also had this problem, and I should've paid more attention before attaching the skirt.

That's okay, I just solved this by sewing on a thick length of really pretty lace. Lace solves all sewing woes, didn't you know?

I'm really pleased at how I matched and stitched in the ends of the lace. Yes, this next picture is definitely on my computer desktop now. Does anyone else do that?

Problem 2: I cut the skirt too short!
The "knee-length" option in the pattern wound up mid-calf on me (definitely not a petit pattern, that's for sure. Or else the models drawn on the envelope are descended from Daddy Long Legs). I sort of forgot that the nightgown was empire waist, so I cut the skirt to the length I normally do from the natural waist, and now the skirt ends a few inches above the knee.

Really, it's fine, and adding a 1 inch wide length of lace helped immensely. (I told you lace solves all sewing woes.) I just may have to make a pair of bloomers to go underneath, because bending over is dangerous!

Anyways, I'm very pleased with my very cute nightgown. I'm starting to consider moving away from the pj pants and old tee's, and this is a good step away from them. Also considering that my new apartment runs on the warm side, I'm going to like having some cooler nighties, even if this one is made of flannel. I may need to make another one in cotton!

They're very comfy to lounge in, too!
Related Posts Plugin for WordPress, Blogger...