Friday, February 28, 2014

Sew Grateful: Sewing Project Day

http://www.myhappysewingplace.com/p/sew-grateful-week.html
Hello there you lovely sewing community you!  Look, I have another Sew Grateful post, again written up on the wrong day for most of you!  But it's still the 27th here, so nah nah nah nah naaaah nah.

What's lined up for today, you ask?

Thursday the 27th February: Sew Grateful Sewing Project Day.  Showcase your latest sewing project. Whether it's a project using up that pattern that was a present from someone or that you won in a giveaway or using a tutorial someone has prepared, or even a project inspired by someone in the sewing community... the possibilities are nearly endless!

*sigh*  I don't really have anything sewn up - and certainly not recently - that lands in that criteria.  Not really, anyways.  But I have a little tutorial to share with you all for a very simple and fun project: A Garter!
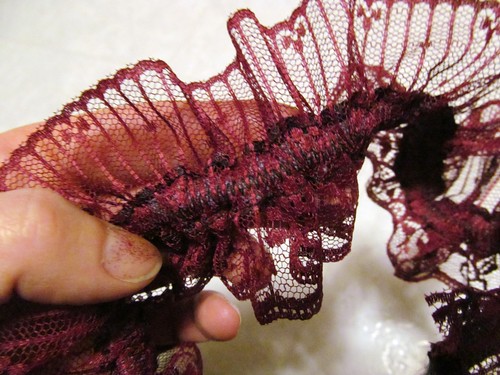
See, we just had Rendezvous, our winter festival that celebrated it's 50th anniversary this year!  It was a ton of fun, filled with wacky contests (chain saw chuck, one dog pull, flour packing, axe throw, dog howling, etc), beautiful snow scultpures, Rendezvous Queen and Sourdough Sam, and the Keystone Cops locking up any man who doesn't have a beard and woman who doesn't have a garter.  It's dangerous business, running around Rendezvous unprepared.

Photo Credit
Seriously, they'll lock you up until you or someone else bails you out with a donation to charity!  And yes, you can get them to lock up your friends if you bribe the Kops.

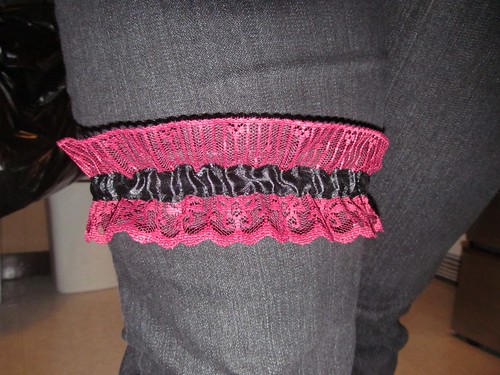
Anywho, this meant that I needed a garter, and quick.  I nearly bought one at our local fabric shop, but they were just too small for my *ahem* slightly larger than average (I guess) thighs.  They wouldn't fit!  So I bought some lace and ribbon, and made my own.

Instead of burying the tutorial in this post, I've written up a separate post, which you can find here.  It was fun to get into the spirit of Rendezvous and avoid some jailtime (the boyfriend would probably abandon me, the jerk).  I have some lofty plans for next year though. 

Photo Credit
Because so many people dress up in garb from the gold rush, and there were some spectacular turn of the century dresses worn around at different events.  I think I need to make one for myself next year!

And honestly, based on one of her recent posts and many others on her blog, Leila from Three Dresses Project is going to be a huge inspiration on that project!

Thank you all for being so inspiring, be it from blogging your sewing adventures, reviewing patterns on Pattern Review, or simply by being so awesome in your comments and suggestions here and elsewhere.  You're all what makes this sewing community so (sew?) spectacular!

You're all so supportive!  :)

Homemade Garter Tutorial


For reasons mentioned here, I had the fun opportunity to sew up a garter!  And it was so much easier than I expected.  Still, some people were surprised when I said I'd made it myself, so I thought I'd throw together a very quick and dirty tutorial on how to sew one.

Please forgive the powerpoint pictures.  IF IT'S GOOD ENOUGH FOR MY M.Sc. THESIS*, IT'S GOOD ENOUGH FOR THIS BLOG.  I ain't no fancy photoshopper or photo editor!

Anywho, here's what you need:
  • 1/4 inch elastic - length needed to snugly fit around your thigh (where you want the garter) stretched out tight. 
  • ~3/4 m wide lace - mine was ~2.5 inches wide.
  • ~3/4 m ribbon - mine was 5/8 inch wide.
  • Matching thread.
Legend for my upcoming awesome Powerpoint figures

STEP 1: Attaching Elastic to the Lace


Look at that sweet elastic and lace drawing!  Stretch that elastic as much as possible as you sew.  Don't worry if you have excess lace.
Sew elastic to the middle of the lace using a zigzag stitch, stretching out the elastic as far as possible as you sew.  I just eyeballed this - it's not really noticeable if you go off-centre once it's all scrunched up.

I found it easiest to control the lace and elastic if I held both ends as it passes through the machine.  Make sure to backstitch at the beginning and end to solidify the stitch!


STEP 2: Sewing on the Ribbon

This part is a little tricky.  Tack the ribbon to the lace at one end with the elastic sandwiched between the two.  I recommend having the lace on top and the ribbon on the bottom.  You could have the ribbon on top, but I found it easier to see if the elastic was covered when looking through the lace.

Most normal people would probably pin this.  I eyeballed it.  What can I say, I'm lazy.

With the elastic and lace part stretched as far as possible, sew along one side of the ribbon through the lace using a straight stitch, catching just outside the elastic if possible.  (Don't worry if you sew through the elastic, just make sure it's stretched out.)  Sew to the end of the elastic, and backstitch.

Repeat on the other side of the ribbon.  The set up for these two rows are fiddly, but it gets easier once you start sewing.

The above photo is the underside of the garter.  See how the elastic is zigzag stitched to the lace, and the ribbon is straight stitched to the lace, sandwiching the elastic.


STEP 3: Snip and Seam

This part is easy.  Snip off the excess lace and ribbon, where the elastic ends...

...then line up the ends, wrong sides together, and stitch a straight-stitch seam up the side.  I backstitched over the elastic portion a few times to give the seam more strength.

Snip your threads, trim your seam (if needed), and you're done!  Easy peasy.  Wear your gorgeous hot little garter with pride and proudly flaunt that you made it yourself.  Brace yourself with demands to make everyone else one.


* I'm serious, I created most of my M.Sc. thesis figures and diagrams in Powerpoint.  It's a point of pride for me.

Wednesday, February 26, 2014

Sew Grateful: Sharing Resources Day

http://www.myhappysewingplace.com/p/sew-grateful-week.html
Came across this on Sew Essentially Sew's blog today - what a great idea!  I'm coming in late to this, but I adore our lovely little online sewing community, and I want to give back.  I might play catch-up, or I might just continue on from here and maybe do the Day 1 (Giveaway Day) later on, once I get organized.  Either way, I'll at least start with today's topic. 

Even if it's tomorrow for most of you.

Wednesday the 26th February: Sharing Resources Day. Share a free pattern, share some vintage sewing resources, share a tutorial or share some great sewing resource links!

This past rotation in camp, I was procrastinating on Debbie's Blog (Stitches and Seams) enjoying some very informative entries, and I came across her post about SBCC Patterns.  In particular, their free t-shirt pattern, the Tonic Tee.

It's a basic knit t-shirt pattern that comes in sizes XXS-L and XL-3XL.  While they charge $10 for a paper copy, they're offering the PDF version for free! 

All honesty here, I haven't tried it yet.  But I've got it all printed out, and it's in the list of Things-To-Sew in my upcoming Sewcation, so I'll let you guys know how I feel about it when I get to it.  Debbie did sew this though, so go check out her post about the pattern!  She even includes some helpful advice for attaching the neck binding (which I'll be stalking excessively this weekend).

Guys, SBCC Patterns have a bunch of really cute patterns, and I'm interested in their Mimosa Blouse and possibly the Empire Waist Blouse.  (*psst*  Debbie also made the Mimosa, and it's adorable!)

So that's my "free pattern" share.  Not sure if that's exactly what was meant for this day, but I've been excited to try this out and share with you all, so why not a little early! 

...Hopefully it's a decent pattern and I haven't shared something awful with you all...

NAH.  Debbie seemed to approve, and that means a lot in my books!

Saturday, February 22, 2014

Holla Knits KAL

I keep trying to write this post, but it's been like pulling teeth.  There are 3 other drafts saved in blogger.  Oops.  SHALL WE TRY AGAIN.

So a while back, I came across Holla Knits, a site dedicated to providing fun, stylish and very wearable knit and crochet patterns.  I enjoyed cruising through their patterns, but none really called to me.  Well, maybe the Henri.  But in general, they didn't really seem to be my style.

But I kept coming across them, on Ravelry and on various knitting blogs.  And every time I came across their patterns, my eye would linger longer and longer.

Then the Holla Knits KAL (knit-along) was announced, and I looked through the patterns again.  And all of a sudden, I could see it. I could see these patterns in my wardrobe.  I loved the Henri, but as I said last post, I'm a cardigan girl.  But then I looked closer at the Eastwood Cardigan.

Hello there, tweedy stripy cozy drappy front cardigan with POCKETS, you're gorgeous.  And I happened to have some yarn already in stash that was destined for something stripy anyways.

Yessir!  KAL project is a go!

I'm knitting a size 40 using Knit Picks Wool of the Andes Tweed.  I picked up the brown during KP's sale a while back (I think I paid about $1.70/ball), and the blue a month or so later to pair with the brown.  I love the colours together, but I sort of wish I'd used the blue for the front panels.  Oh well.

The KAL started on Feb 3rd, and I cast on that morning.  Got the first panel done in time to leave for camp on the 6th, and managed to knit the second panel while in camp.

Yesterday, I picked up all the 50 bajillion stitches along the side to start the stripes, and I'm about to separate out the right armhole.  Between the textured panels and the stripes, this pattern is just flying off the needles!  I think I'm going to be done this cardigan well within the 3 month KAL.  Heck, maybe I'll have time to make up a bunch of the accessories included in the KAL!

Wednesday, February 19, 2014

Tentative Wardrobe Brainstorming

During this rotation in camp, I've been idly thinking of my current wardrobe - the things I need and the things I want, and what image I want to put forward.

I used to love the idea of the casual professional look - cute skirts and neat blouses, nice jackets to layer over-top, and kitten-heels.  But that's just not practical with my life right now, and I've felt a little disconnected from my wardrobe ever since moving to the Yukon.

See, everything is more...casual...up here.  You don't really see many people booting around in skirts and dresses, and it's not really practical for most people's lifestyle.  Not practical for the lifestyle I'm starting to live.  Don't get me wrong, I still like a good skirt or dress (i.e. my Tiramisu - perfection!) for coffee with friends or a day wandering downtown.  But in general, this is very much a practical jeans and t-shirt kind of place.  Or at least, the parts of it that I live in.  Plus my boyfriend lives in the tattered carharts he wears to work, the ones with the caulking and paint and perpectual cloud of sawdust.  I feel overdressed in my pj's next to him somedays.

And there's the fact that I spend half of the month in a mining camp (well, most of the time).  It's not practical to have two different types of wardrobe - one for in-camp and one for in-town, and I think I'd feel a little spastic if I tried to dress drastically different 2 weeks at a time.  I need stuff that can transition between the two - practical, hard-wearing and not-at-all-cleavagey for in camp, but stuff that'll still look decent for booting around town, chilling with friends, and the occassional road-trip around the territory.

Basically, I think I need good basics that can work in camp, but that I can accessorize for in-town (think scarves, non-camp cardis, etc.).  And I really need pants. 

With all this in mind, I've put together...not so much a wardrobe plan but a wardrobe brainstorm.  Inspirations, things that I'm working on, things that I need, textiles that I have, things that I have that are working, and the things that I need to tie some of these things together. 

Here's the basic rundown of where I want to direct my wardrobe toward:
  • I am definitely a cardigan girl.  I like to layer things, and cardis are great for this.  NEED MORE CARDIS.
  • That said, I need things to go underneath the cardis.  T-shirts, tank tops, simple garments that are light-weight, but have a touch of interest on their own.  Basic tops for under more inticate cardigans, colourful (possibly small-print floral and other cute prints) for under basic cardis, etc.
  • PANTS OMG I NEED PANTS.
  • I'd still like to include a good basic skirt or two.  Because sometimes you just need to wear one.  I really like the simplicity of Cake's Hummingbird skirt.  
  • Same goes with dresses.  I LOVE my Tiramisu.  I wouldn't mind something similar with a more simple bodice - perhaps a Hummingmisu dress?
  • And of course, accessories.  I have a few scarf ideas flowing through my head, and lots of yarn to do it.  Nothing too lacy and fancy, but some pieces that have some cute design details or textural features.  I love wearing scarves, I just don't have many that I like enough.  Possibly I need to knit up that pretty skein of yarn in the middle, since hello colour inspiration!  Also, I want a new hobo bag for tossing my wallet, kobo, books, notebooks, and my latest knit projects into for my afternoons sitting in coffee shops like an unemployed bum. 
And that's about as organized as I'm going to get right now.  I'm hoping (oho, please don't hold me to this) to finish my pants this time out!  Our plans for my second weekend out of camp has fallen through, so maybe I need to declare a sewcation over a few days?  

Okay, back to work.  I might be procrastinating from finishing up stuff on my last day in camp.  Hehe oops.
Related Posts Plugin for WordPress, Blogger...