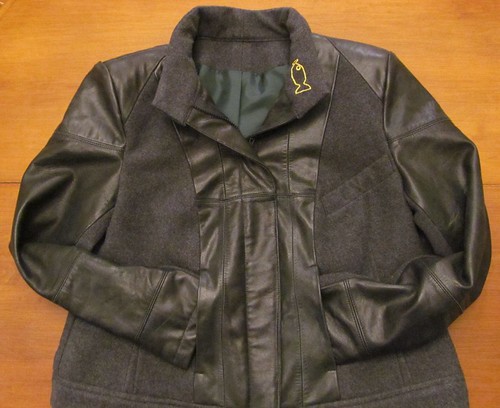
Now that my refashioned Hitchhiker's Jacket is finished (finally), I can get back to knitting up Christmas gifts. Considering that the mail is hideously slow, I need to get these sent out by the first week of December, and I'm so far behind, it's terrifying.
But that's okay, because I just stumbled across a cute gift idea that I think a lot of people will be getting this year: the Owly Bookmark!
Well, sort of. I basically just drew inspiration from the original pattern, because I changed the main part of the bookmark to stockinette from...whatever the heck the designer had going on (I must've been doing something wrong because it looked like a garbly mess when I tried it). And then I changed the owl design to something shorter and stouter, making it up as I went (I've knit a lot of owly things, so I have the gist of them by now). And then I used french knots instead of eyes.
I got it finished off in one evening. The only reason it took as long as it did (maybe 3 hours) is because I messed around with stitch types before I stuck with stockinette, and because I knit this thing so tight, my 3.0 mm bamboo needles are now oddly bent and I suspect the yarn indent on my finger is permanent. It was fun to do though, and I think I'm going to play with different stitches on the main part of the bookmark.
DETAILS:
Pattern: Owly Bookmark Pattern (sort of)
Yarn: Mystery acrylic from my stash - I suspect Red Heart brand (7 g - 11.6 m)
Needles: 3.0 mm
Alterations: Changed main part of bookmark to stockinette. Reduced body length to 6 rows before cabling and reduced the head to 4 rows before cabling. Used french knots for eyes instead of buttons.
New Techniques Learned: Knit through the front and back loop.
Friday, November 23, 2012
Monday, November 19, 2012
PR Re-Fashion Contest SNAFU
Just a head's up, if any of you have gone and voted in the Pattern Review's Refashion Contest already, you might want to go and try again. There's was a problem in the code and some people's votes were accidentially transfered to other entries. I think this originated from a link in the discussion board, so it only affected some votes, but all votes from the last two days have been reset to keep things fair.
So please head on over to PR to vote, if you're so inclined! (Of course, you don't have to vote for me. lol)
Sunday, November 18, 2012
May I Introduce: the Hitchhiker's Jacket
 |
| Got my towel, babelfish, and cool jacket. Lunch at the Restaurant at the End of the Universe anyone? |
And then I basically put the movie on loop whenever I was sewing the jacket, and it became sort of a thing.
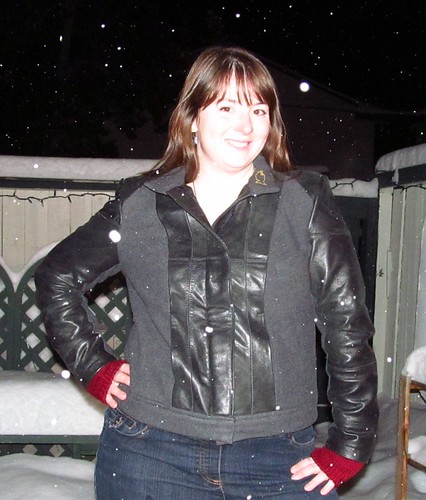 |
| Sorry about my blinding white skin (use your towel to sheild your eyes). Flash does horrible things to my complexion. Great things to falling snow though. |
DON'T PANIC
This has been my mantra throughout the last days of finishing off this jacket. It was a mad race to finish this ontime for the PR Refashion Contest, and I literally had minutes to spare once I submitted! But I did it! I was so worn out after finishing it, I sort of put off writing this blog post. Sorry for the delay.
Recap of Details:
Pattern: Burda Style Magazine 09-2012 #135 Blouson Jacket (plus sized)
Size: 46 from shoulders to bust, graded to 48 below the waist
Fabric: Thrifted Nygard wool jacket (XL) and Garage Sale Danier leather jacket (L?), and a poly lining from the crappy local fabric shop.
Alterations: Grading size, changed the shoulder yokes from wool to leather
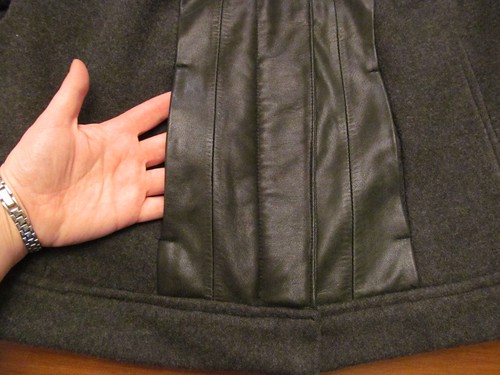
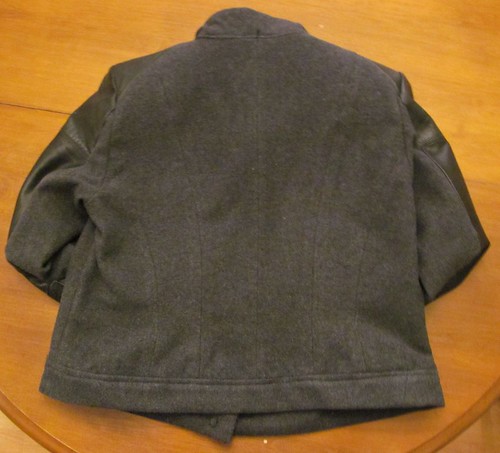
In the end, I'm glad I didn't add leather to the back panels, like I thought of doing while working on the toile. Despite the size of the jacket, there just wasn't enough leather to cut out the pieces, especially once I cut the last facing the wrong way and had to seam together the last piece. I did, in the end, change the triangular shoulder yokes from wool (as the pattern suggests) to leather, mostly because I was out of wool fabric. I even had to patch together the wool waistband piece because I was down to scraps of wool. (Although looking at the pictures, I really wish I could've done the waistband in leather. Ah well, such is the way of refashioning - sometimes you have to make compromises.)
 |
| Here's the front panel facing I had to patch together. Turned out alright! |
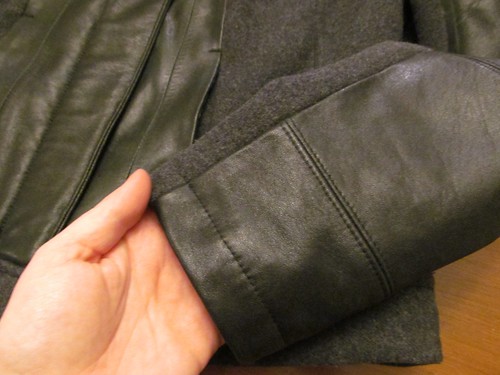
The very last seams I had to do were the sleeve hems, and I admit, I cheated a bit. Because neither the leather nor the wool frays at all, I chose to simply fold them over once, tuck the lining underneather them, and stitch. While this may not look all that professional, the seam line doesn't bother me at all, and the hem isn't bulky, and I've been doing everything I can to reduce bulk in throughout this jacket. Plus it let me finish up quickly, and that was urgently needed at the time.
One of the things I was super pleased with was how the pockets turned out. They're set in the seam between the leather front panel and the wool side panel, and I worked hard to get them in properly. What isn't clear from the Burda instructions is how small these pockets turn out in the end, because you actually sew the zipper right through the pocket, reducing the size by a third. I can still mash my keys and my cell phone in them (although not in the same pocket), but it was disappointing.
Actually, the instructions were entirely disappointing. I wound up mostly making it up as I went along, they were so convoluted and confusing.
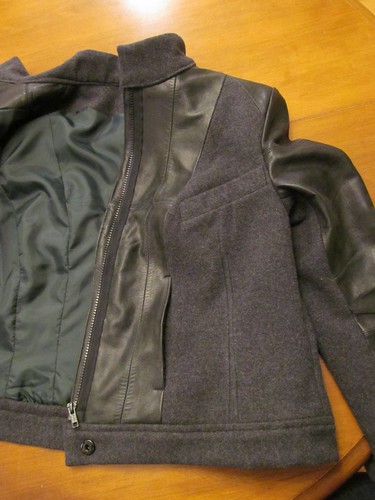 |
| Zipper, snap at the waistband, and look! Chest welt pocket! |
 |
| And then I embroidered a Babel fish to the collar. I'm all set for translating any aliens that comes along. |
"The Babel fish," said The Hitchhiker's Guide to the Galaxy quietly, "is small, yellow and leech-like, and probably the oddest thing in the Universe. It feeds on brainwave energy received not from its own carrier but from those around it. It absorbs all unconscious mental frequencies from this brainwave energy to nourish itself with. It then excretes into the mind of its carrier a telepathic matrix formed by combining the conscious thought frequencies with nerve signals picked up from the speech centres of the brain which has supplied them. The practical upshot of all this is that if you stick a Babel fish in your ear you can instantly understand anything in any form of language. The speech patterns you actually hear decode the brainwave matrix which has been fed into your mind by your Babel fish.
Hitchhiker's Guide to the Galaxy, by Douglas Adams
I'm suprised at how warm this jacket is. The night I finished it, I wore it to go pick up my roommate from the airport, and despite it being -16C (3.2F) and only wearing a t-shirt underneath, I was more than warm enough. YEAH WIN!
You guys have been awesomely supportive through this entire thing, and I guess I only have one more thing to say:
So long, and thanks for all the fish!
Thursday, November 15, 2012
Wool and Construction and Lining (OH MY)
 |
| FYI, it's about 5 pm in this pic |
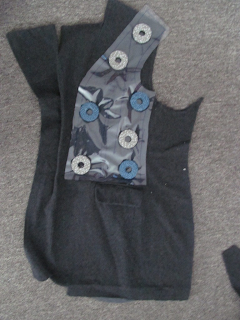 |
| Front panel of the original jacket. I cut the left front side panel to catch the welt chest pocket. |
As you can see, this is a legitimate pocket, which was a nice surprise. Especially considering the pocket opening was still sewn shut. As you can also see, the entire front panels of the original jacket were lined with a light-weight fusable interfacing. I like the stability it adds to the fabric, but it doesn't bulk or stiffen it up at all, which is good.
The other piece that I was happy with the cut out was the centre back piece. When I did the toile for this jacket, I added a centre back seam in case I had to do a sway back adjustment. I didn't - this jacket actually curves along my lower back and upper bum beautifully - but I liked the additional seam. The original jacket had a centre back seam, and I just cut this piece directly on that seam, so I get the look, without having to sew that seam. Go laziness!
Here's the back piece (inside and out). I really liked the triangular yokes on this jacket, and
 |
| Left: before topstitching; Right: after topstitching. |
One of the things I learned from the wool jacket was how they dealt with the hems. You can see that they not only used the fusable interfacing, but also a woven sew-in interfacing for extra stability. Nice.
One of the ongoing issues with this jacket is reducing bulk...anywhere, but especially at the seams. This leather is thin, but not that thin. I trimmed every single seam I possibly could.
I don't think I've shown you the lining yet. I wound up buying some at my local (crappy) fabric shop because the original jacket's linings were not in great condition. I have no idea what the fibre content is, because our fabric store doesn't actually indicate that on any of their fabric. It's basically a guessing game. It's wasn't that expensive though, when everything there is expensive, so I don't have high expectations. Of course, it was the only kind of lining there, and you know what they say about beggers.
ANYWAYS, I chose this pretty deep green, which my camera doesn't really want to capture properly. It looks almost black in some lighting, and a lovely dark emerald-green in others.
This wasn't included in the pattern, but I added a pleat in the centre back (obviously I didn't add a centre back seam). The wool and leather has a bit of give, but the lining doesn't at all, and I didn't want to restrict my movement.
I'm much further along than these posts have shown. The shell is almost entirely together, minus the waistband piece, and I just have to attach the sleeves to the lining before sewing it to the jacket. Then it's just hemming the sleeves and attaching the waistband. By tomorrow night. Well, way before tomorrow night, because I have to take pictures and write a review still. Oh gosh. Was hoping to get the sleeves on the lining and sew the lining to the jacket tonight, but I think my brain hit a wall and I just couldn't do it. Hense this post!
Alright, time for bed! Happy sewing all!
Tuesday, November 13, 2012
Making Due With Scraps
I realized yesterday that I was missing the second collar piece. I'd been forced to chop the collar piece in half to begin with because the wool fabric was getting tight, and after I eeked those pieces out, I completely forgot to cut another set.
 |
| First collar piece below, new piece above |
I managed to cut out another collar piece from two scraps. The attaching seam was deliberately offset to reduce bulk on the collar. The shape is a bit wonky, but that should be hidden in the seam allowance. WHEW!
Unfortunately, this used up one of the larger scraps of wool that I'd planned to use in the waistband. So I had to get a little creative patching it together.
 |
| Sorry for the crummy photos. Poor lighting and charcoal grey wool are not a good mix. |
I pinned the snot out of all the scraps to keep them in place and on the pattern piece, and flipped the whole thing over. Since I forgot to add seam allowance to my toile waistband, I eeked out another inch width to give myself 1/2 inch seam allowance. More than enough!
I cut out the waistband piece and flipped it over. Then I pinned the two overlapped pieces together and zig zagged the pieces together from the top. This reduced bulk like crazy, especially if you trim the overlap from the underside. I was extremely careful with the placement of this overlap, because now when I fold the piece in half, this seam does not show on one side!
Then all I did was trim the pieces so that I could sew the side pieces to the patched middle piece (at an angle to reduce bulk when folded in half), and pressed the seams flat.
A matching pair of nearly-invisible seams will be all that's visible from the right side of the jacket. How's that for making it work?!
Sunday, November 11, 2012
Thrifted Leather Jacket: Deconstruction and Recreation (Pic Heavy)
I've been working hard on my entry for the Refashion contest over at PR, and taking a whole whack of pictures. I'm serious, a Whole Whack of them. I'm going to share all the fun I've had with taking apart and cutting out pattern pieces from this leather coat
DECONSTRUCTION:
I noticed a lot of neat things about this jacket while taking it apart. Some are design features, other are construction methods, and I thought I'd share some of my favourites here.
This leather jacket is made up of smaller leather pieces seamed together. One of the things that impressed me was how they incorporated the slit (???) pocket and bound buttonhole along the seamline at the hip. I thought this was a great idea, and really shows the quality of this jacket (it's by Danier, btw, and the leather is so soft and supple).
I like that they included a piece of leather inside the pocket so that you don't see the pocket lining fabric from the outside of the coat. I learned this lesson on my corduroy jacket's welt pockets, but it's nice to see a good example of how such a little detail can make such a difference. Especially if your pocket lining material is bright.
Because the bound buttonholes were so thick, they made a tall shank at the base of the buttons, and then anchored the button with a smaller one of the backside for more support. If I were doing buttons on my jacket, I'd definitely use this trick to avoid tearing through the leather. Plus it's a bit cleaner looking on the underside.
Love how their collar turned out. The points are so sharp! Impressive considering how bulky the leather can be.
You can also see how they topstitched the horizontal seamlines and left the vertical seams alone. This tends to emphasize the horizontal seams and lets the vertical seams disappear a bit more, which helps prevent a patch-quilt sort of look
On the inside, I noticed that all of the seam allowances were glued down, and the horizontal seams were all interfaced. Not sure about the reasoning for the latter, but I totally stole the former idea. It's really helpful because you can't actually iron down the seam allowance at all.
I admit, I stopped and petted the suede inside for a while. SO SOFT!
They bagged the lining, and managed to make both the bottom hem and sleeve hem with no stitches. I was impressed with how they did this without the hem dropping at all.
Turns out the answer is some sort of interfacing (web? woven? I don't know my interfacings) along the hem where it folds up, and then glue the heck out of the hem. I guess this provided some stability (with leather?) or perhaps kept the fold sharp (???), and the glue helped hold it in place. Totally stealing this idea.
RECONSTRUCTION:
So basically, I ripped off the lining, dropped the hem and opened the facings, took off the sleeves and collar, and split the shoulder seam to make a flat piece of fabric. You can see the first piece laid out on the jacket: the front panel. It was supposed to be cut on the fold so that it's self-faced, but I couldn't do that with my fabric. I chose to cut out 4 of the front panel and sew two together.
Except there wasn't enough space to cut the facings directly from the jacket. I'd have to patch it.
 |
| Hacked off the pocket section |
 |
| Used binder clips to hold leather pieces together (can't pin leather or else the pin marks would be noticeable) |
 |
| Try to line up vertical seamline |
 |
| Stitch, then trim and glue down seam allowance |
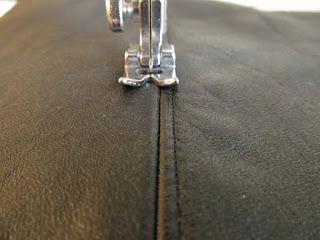 |
| Topstitch on either side of seamline |
 |
| Notice afteward that your vertical seamline weren't aligned. Give up and cut out facing piece |
Of course, then I messed up.
I forgot to take pictures, but you can see my whining about it over on the contest discussion boards.
The biggest problem was that getting all the pieces I needed was going to be tight as it was. I actually had to walk away from this all for a couple days because of how upset I was.
When I came back to it, I started on the upper part of the two piece sleeve, which was going to be in leather. I cut it out from the original jacket's sleeve, but had to patch on a piece to the bottom due to the pattern sleeve being a bit longer and the grossness of the original jacket's sleeve hem. Used the same method as above.
This leather, btw, is beautiful to work with. I've been using size 12 sharp needles instead of leather needles, and there hasn't been any problems. Well, there was one, but I'll talk about that in a sec.
Once I got through the sleeves, I went back and frankensteined a new inside facing, being extra cautious to cut it the right way. You can see the new frankensteined facing piece on the left above, and the front panel on the right. I took great care to make sure that the two front panels matched as much as possible, and that the seamlines for the patched facings were not lined up with the seamlines of the front panels to reduce bulk.
I then stitched the front panel and facing together. I don't have pics here right now, but I had two problems with this:
- The seam curves a bit inward at the top and bottom, so the whole front line of the jacket looks a bit curved. I decided that I can live with this, because unpicking leather is hard.
- I chose to topstitch along the edge of this seam, and I broke a needle half way going over the fankensteined facing seamlines. Oh well, I'll just use a stronger needle next time.
I forgot to mention, but before stitching everything together, I decided to freshen up the leather a bit. Many internet sources suggested using a mix of lemon juice and olive oil, so I did just that. The lemon juice cleaned the leather, and the oil added moisture. The test strip above was taken from directly adjacent to the piece it's laying over, and you can see the difference it made!
This is all that's left of the jacket after I was through with it. Unusable scraps to the right, and possibly useful pieces to the left. And in fact, I'm going to have to get the 4 triangular shoulder yokes from these scraps somehow because there is literally none of the wool jacket left to cut them out.
I'm a bit proud of how I've managed to use up all the material from these jackets! Let's hope that the final result turns out. If it doesn't though, I've learned a heck of a lot on this project. :)
If you managed to get through this extremely long post, thanks so much for your patience! I didn't realize it would be such a beast until I was half-way through it.
Subscribe to:
Comments (Atom)


