Showing posts with label dresses. Show all posts

Saturday, January 26, 2013

FNSI - Progress on a Tira Bodice

I've been so excited to start sewing my Tiramisu dress by Cake Patterns, ever since I started prepping the pattern and cutting out my fabric a few weeks ago.  When I saw that last night was the Friday Night Sew In, I knew it was perfect timing.  Bought a bottle of wine, tidied up my sewing space, and got to it.

Slowly.  Because that's my style now. 

Took me all night, but I got the bodice put together, with pretty contrast topstitching and no puckering in the binding.  So proud!

Once everything was together, I hand-basted the sides and tried it on.  AND IT'S TOO SMALL.  *wails*

Sorry about the blurry photos, it was tough taking a picture while keeping the girls from escaping.
This is me, stretching that front wrap as far as it'll go to cover my bust.  And it's not very covered.  :(  I cut a 40B for the front.  I thought it seemed wrong to cut a B cup size considering I wear a 36D bra, but I figured it'd probably still work.  The fit of the front bodice isn't actually that bad, the shoulder's are comfortable and sit nicely, I just need more coverage for the girls (maybe a 40C? I think a 40D might be too much).  And a bit more width.  But that's not the front pieces fault.

Look at me, blending into the walls. Haha just kidding, the walls are much darker than my fish-belly-white skin (thanks Dad).
The biggest issue is that the back piece is too small, or at least not wide enough.  I cut a size 35 for the back, but now I'm wondering if I traced the wrong size.  See howfar the back waist piece sticks out?  That struck me as odd at the time and I even double checked the piece to make sure I'd traced off to the 35 size, but I figured I'd just go with it.  Should've been my first clue that something was wrong.  If the back bodice had lined up to the back waist piece properly, the seam would've sat closer to where it should've been. I'll be going up at least one more size for the back. 

Luckily I have another half metre or so of this fabric, so hopefully I can eek out the pieces I need!

*~~*~~*

On another note, I've mentioned a few times in the past how photos make you look at your body from another perspective.  I'm not a thin woman, but those last two pictures just showed me that I'm not as big around the middle as I pictured in my head.  I hesitated before taking them for the purpose of posting in the first place but I figured eff it, it's fitting photos and nothing obscene is showing.  I was pleasantly surprised that they weren't as bad as I expected.  It's funny the fake image you get in your head about yourself.  I think that sewing has really forced me to confront that fake image, and accept the reality of it.  I can even go so far as saying that sewing has given me so much more self-confidence.

Anywho, I'm off to the shop, but then I'll be playing with my Tira some more tonight.  Hopefully I'll have a better fitting bodice for you guys tomorrow.  :D

Wednesday, January 9, 2013

Tiramisu 30 Minutes a Day Sew-Along: Days 1-3

My office - seriously.
For those who didn't make it that far in my 2012 recap post or just plum forgot, I now work as a geo at a fly-in mine here in Yukon. I work a 2 week rotation, so please forgive me if I disappear for half a month at a time.  I've already pulled one rotation, and will be leaving on my second one tomorrow morning!

Despite this, I sort of signed up for Cake Pattern's Tiramisu 30 Minutes a Day Sew-Along!  StephC is doing a fantastic job of organizing it and guiding us along.  Wish I could follow along each day for the entire thing, but oh well, the posts will still be there when I get back.

Day 1 had us gathering up our supplies into a box or bag or basket, and then tracing the pattern.  I forgot to snap a picture, but I'm using one of the many wicker baskets I have laying around.  I liked this step especially because I'm in the middle of moving and my sewing supplies are scatted to the wind.  This lets me keep it all in one spot and ready to go for when I come back to the project.  Steph is a smart woman.

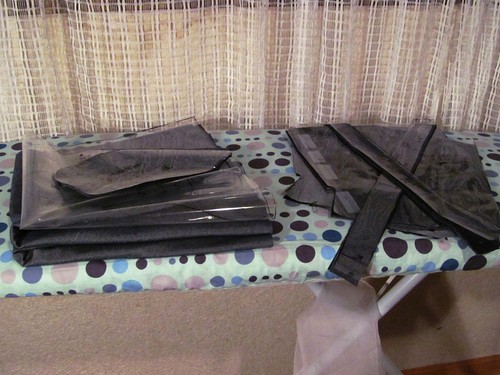
Day 2 had us cutting out the pattern from our fabric.  You can see my pile above.  I'm using a lovely denim-like knit that I surprising found in our severly lacking local fabric shop.  My cutting was fairly simple as I don't have stripes to match.  Since this fabric has a diagonal texture to it, it's really hard to match up on the seams, so I've opted to rotate the skirt piece and cut on the fold to eliminate the centre front and centre back seams.  I know this will effect the drap of the fabric, but Steph did the same thing on her polkadot Tiramisu, and it looks just fine.

Sorry about the dark crummy picture. The lighting in my sewing room sucks right now.
Day 3 (today) has us pressing our neck and sleeve bands in half and ironing on strips of fusable interfacing to the shoulder seams and pocket openings.  I should be packing up today so that I can cuddle with my boyfriend tonight without worry; instead, I did the day 3 chores PLUS then played with stitch options. 

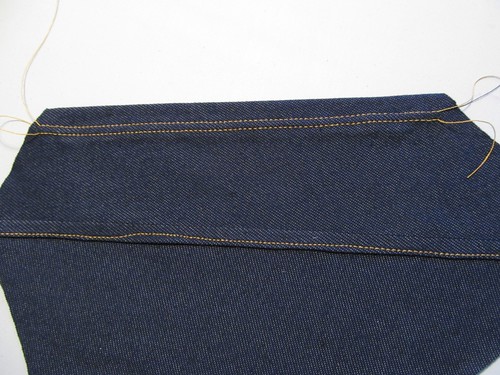
See, since I'm using a demin-like fabric, I want to use some denim-like seam finishes, and that includes possibly a flat-felled seam along the side seams.  It worked out decently on my test scraps (although I got distracted part way through and my needle wandered off), but I'm not sure if it'll work well as a side-seam on a knit dress.

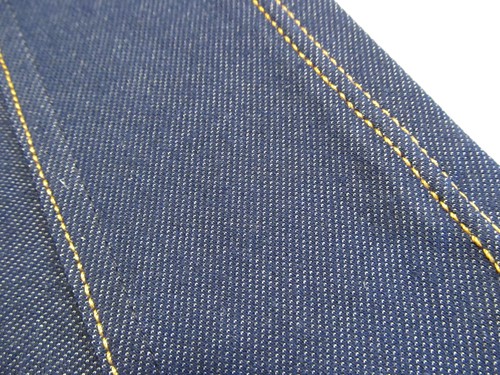
I also tested out using a double needle with the thicker gold topstitching thread.  I'm going to have to really crank up the tension to make it work, since the stitches pull through to the underside of the fabric.

I don't know, what do you guys think?  Ever use a flat-felled seam on a knit before?  This knit has some weight to it, but I had to steam the crud out of it to get it to fall flat again after stitching the seam.  (But then, I had to do the same with the double needle seam too.)

ETA: The reason I want to do this is two-fold.  I want to carry on the look of denim jeans in the dress, and since jeans have the flat-felled seams on the sides, I thought it'd be perfect.  But more importantly, the diagonal texture on the front and back skirts will be meeting at nearly perpendicular angles (much like the picture above).  Having the flat-felled seam there would obscure this more than I suspect a regular seam would.  But a lot of you have mentioned the weight of the seam, so I think a bit more investigation is needed before I attempt it.  Thanks everyone.

Friday, January 4, 2013

Project Planning Yo!

I am itching to sew, it's a little bit ridiculous.  Well, I guess not considering how little of it that I've been able to do lately (Hitchhiker's Jacket just wet my appetite).

I'm moving today.  Tonight, I'm setting up the basics of my new sewing room (more info on that later), and tomorrow (hopefully), I'm sewing my own version of the Tiramisu!  I'm so jealous of all of you who have been making it lately. 

It'll be made out of this denim-like knit.  I'm actually surprised to have found it in our local fabric store, since their knit fabric selection fits on one 3 foot shelf (and there's a lot of rib knit and polyester on that shelf).  I took home the last 2.5 m of it.  I don't want to think about how much it cost me, thanks.

AND, I bought wool to start knitting myself a sweater.  Uh yeah, today was not a good day on my bank account.  Haha oh well I HAVE A JOB NOW.  Anywho, it's Cascade 220 Heathers (\o/), in a lovely burgundy with blue fibres spun throughout.  I love it!  Also, it was one of the only colours that had enough skeins for my project.  I'll share more about the pattern another time.

So yay, creating again!  I'll keep you posted about the Tira progress tomorrow.  :)


Sunday, December 11, 2011

Rush Order Christmas Party Dress

I've mentioned here and there (twitter, comments on other blogs, facebook, etc) that I was doing a sewing marathon yesterday, trying to finish off my Christmas party dress (never in the world thought I'd make myself a 'party dress', but that's how life goes sometimes) in time for my work Christmas dinner, and then a friend's party afterward.

Well, I get 'er done.

For a specific definition of 'done'.

I decided a few months ago that I needed Simplicity 2305 - a Cynthia Rowley garment - out of green satin. This is probably the very first time I just wanted to make a pretty party dress. I think I need to make more, because dresses are awesome!

Anyways, I had most of the pieces cut out of a crepe-back satin by Friday night, and even attached the front and back bodice pieces. Saturday, I procrastinated...a lot, but after a short walk and a cup of coffee, I rolled up my sleeves and started sewing at about 11:30. And barely stopped until I finished the darn thing.

Of course, I finished at 6 pm, exactly when my work dinner was starting. BUT there's nothing wrong with being fashionably late, especially when you're wearing a knock-out dress!

I got tonnes of compliments on it, and loved people's reactions when I told them I'd made it. The best part, though, was when they asked how long it took me to make it, and I said 'um...today'. :)

Of course, I didn't point out all the problems with it. For one thing, the whole dress is too big. I cut a size 16 for the arms, 18 through the bodice and waist, and a 20 for the hips, as per my measurements. I should've stuck with a 16 for the entire bodice and an 18 for the hips. You can see in the two pics below how much nicer the dress would've looked if it was snugger around the waist.

And look! I did my first successful FBA! While the dress was big on me along the sides, the bodice was really comfortable, but not too baggy. I think if I hadn't done the 1 inch FBA, it would've been too snug and ill-fitted in the bust. Okay, I'm sold. It's wasn't even that hard after all, probably thanks to my copy of Fit for Real People.

I found the sleeves a bit too long. It'd look much nicer if the cuff ended just above my elbow, instead of hanging over it when I stand. Think next time I'll shorten the cut-on sleeves a bit.

Also, I did my very first invisible zipper...at 5:40 pm. I didn't even have time to do a practice run. It's not very invisible, but since it's on my side and covered by my belt and arm, I don't think it's that bad. Plus look at how well lined up that waist-band is! I'm that proud.

The zipper is really rough on the inside, but I just didn't have time to finish it. I'll have to though, because the satin frays like crazy when you simply look at it and even worse when you don't.

Most of the seams were finished in a mock serger fashion, using a tight zig zag stitch. I think this is my favourite finishing technique, since it's simple and strong.

I did take the time to hand stitch the hem, since I didn't want a visible stitch line along it. For a 10 minute job, it looked decent. This satin refuses to be pressed sharply, so it's a little poofy (as are all the seams).

I'd like to think I'll take the dress apart and at least take in the waistband and the skirt, but I probably won't. That's why belts were invented, yo! I wouldn't mind making another version of this dress, though. It's super comfortable to wear, looks awesome, and I don't think it's too distinctive of a pattern to have two versions of. I think it'd even look good as a day dress, if you use different fabric.

Here she is, inside out. I LOVE the crepe-back satin, and sort of wish I'd used the crepe side somewhere on the outside of the dress. Oh well, next time.

So despite all these problems and the rush, it was a successful dress (although next time I'm adding pockets). Now I just need to figure out how to wash satin, because I got a couple drinks spilled on me, and you can see the marks on the dress. :(

Oh also, look what I made while waiting for the cab to arrive! Cut out a circle of fabric big enough to contain your wallet and whatever else you need, tightly zig-zag around the edge and trim, zig-zag a length of ribbon on the outside, and voila, instant purse!

For more specific details on the dress (sizes, fabric type, alterations, etc), please check out my review over at PR.

Wishing you all a Merry Christmas and a great holiday, from me and my three little plant pets! (From left to right, Lowell the Aloe Vera, Tiny Tim the...tiny tropic, and Agetha the Aglaonema)

Sunday, October 23, 2011

Thinking Pink Blouse, and Other Rambles

I was planning on posting when I finished the project that I'm working on, but it occurred to me that I'll never actually post anything that way. Plus I have too many fun things to share, and I'm at a tedious part of my project.

So PR is having a 'Think Pink' contest, and all the lovely pink garments in the gallery really inspired me. I figured 'hey, I need more office work blouses (I've been itching to make this Simplicity 2339 pattern), and a pink one would be fun!'

Then I got sent out of town for the weekend. However, when I got there on Friday morning, they told me they only needed me for the day, so luckily I was able to get my plane ticket changed and was home by Friday night. A shopping trip yesterday yielded this lovely pink chambray! Up until yesterday, I didn't know what a chambray was. According to thefreedictionary.com, it's a lightweight plain weave fabric where white threads are woven with a coloured warp. According to ehow.com, it was originally created in Cambria, France, from which the fabric name was derived.

Learning all this made me realize that my Lucky Business Dress is made of a chambray. YAY! That was really bugging me. My pink fabric feels a bit heavier and less flow-y than what I used for the dress, though. It doesn't iron out as smoothly either, so maybe the fiber content is different between the two.

Anyways, I have all the pieces cut out for the blouse, and just need to finish transferring the bajillion markings and find cut out the interfacing pieces. I'm really hoping to finish this thing tonight, because I have to leave for field work tomorrow morning, and won't be back until the weekend (I hope). The contest closes on the 31st (a Monday), so I should be able to photograph the top and get my review made up when I get back.

*~***~*

I've been slowly settling into my apartment. I'm no where near finished unpacking, but I'm getting some parts of my sewing nook set up. I came up with a cute way to organize my patterns! I sorted the patterns according to type (tops, bottoms, coordinates, dresses, etc.), and then made little dividers to put between the sets. Instead of labeling them, I drew on fun little images of the pattern types. They make me smile whenever I see them, and it's so much easier to find what I'm looking for now!

I found a few other treasures during my shopping trip yesterday. At the fabric store, I picked up some black broadcloth and a bunch of fun trim and hardware to make a curtain and an under-sink skirt in my bathroom. I have a big window in there that faces the back entry (and I'm on the main floor, too), which most people use or smoke in front of, and while I have blinds on it, it still makes me nervous to shower at night in there. I figured I'd make a curtain to cover any gaps in the blinds. I'm super excited to get it finished and show it off to you all, because while I hated the (pink, 1950's style) bathroom when I first saw it, it's quickly becoming my favourite room in the apartment!

The other thing I found was this 1960's dress pattern, in what is nearly my size! A bit of alteration will be needed to fit it, but I'm super excited that I get to make my own '60's dress after giving away all those lovelies in my vintage pattern giveaway! I think I finally found a pattern for a piece of black and white polka dot fabric I found this past spring!

Although now I'll probably eat my own words on how much I like that older patterns don't baby you along. Oh well, it'll be an interesting challenge!

ETA1: Oh! If any of you like this pattern and are looking for a size 20, I found one on etsy. Looks like it's in much better condition than mine, too! Actually, tcmally appears to have scads and scads of vintage patterns, so go check her out.

ETA2: I should also note that I did actually get something done for the Friday Night Sew-In, although it wasn't much. I managed to work out what sizes I'd need to cut out for Simplicity 2339, and got the pattern prepared for it. I forgot to mention above, but I've totally played with the sizes here, starting at size 16 around the shoulders and neckline, size 18 for the arms and bust, size 20 at the waist, and 22 at the hips (PR reviews indicated that there wasn't a lot of ease through the hips). Obviously I'm a little more pear shaped than I was last year. Mmm...pears. :)

Friday, September 16, 2011

Finished Object: Lucky Business Dress

Best part of this dress? POCKETS!!!

As promised, here's a bit more information about the dress I wore to my interview earlier this week. It's from New Look 6803, and as soon as I saw the version that Stacie made, I knew I needed to make it. This version was supposed to be a wearable muslin, and while it is, I adore how it turned out.

I cut a size 16 (my standard size) despite everyone ever on PR warning that it runs a little big. I'm a bit wimp about doing FBA's, so I chose to just make a larger size. However, I have larger hips than this patterns size 16, but worried that 18 would be too big, I chose to cut a size 17 (aka right between 16 and 18) below the waist. I'm glad I did so, because the hips are almost too small as it is.

And really, that's my own stupid fault, because I know that I'm an 18 on the bottom for skirts and such, but didn't really think about the fact that dresses cover the top and bottom! Oops.

Boy was it ever windy out when I took these pictures!

The neckline is ways too big. You can't really see in the pictures, but it gapes a bit, and just looks too big on me, especially when I'm not wearing a cardigan with it. I think next time I`ll cut a size 14 on the top, and suck it up attempt an FBA.

I love the neckline. The pleats are a lovely detail, and were so easy to do!


Please forgive the public bathroom shot. This was hours after the interview, at my Uncle's birthday lunch.

I have no idea what this fabric is. I found about 3+ m of it at a thrift store (I know, everyone is so surprised about that) for about $6. Initially thinking it was some poly blend, I thought it'd make great muslin material. But it's got a soft hand and a gorgeous drape, can take a hot iron and steam like no-ones business, and crinkles like my Grandma's eyes when she smiles, so I suspect it's more like a linen blend, or something much more natural.

What I loved best about this dress was how the fabric, with its navy and cream threads weaved together, brought the dress from summery day dress, to something a bit more professional looking. Of course, it looks like a sack without a belt on, but with a belt it looks fantastic, and I like it best with a cardigan over top. I feel so professional in the entire outfit, hense why I chose to wear it to my interview.

Just as with the Mariana trench dress that I made for and wore to my thesis defense, it gave me a boost of confidence. And it paid off, because I got a call this afternoon with a job offer, so come this Wednesday, I will no longer be unemployed! \o/

Oh! And don't forget to go sign up for the vintage pattern giveaway!
Related Posts Plugin for WordPress, Blogger...